Real War vs Wargames

What is the difference between wargames and what really happens in war?  While working on our new Battle of the Bulge design, I can’t help but notice the impact of unit boundary lines.


Well it’s another cold snowy Sunday.  Too miserable to go out.  The perfect day to work on our Battle of the Bulge design.  Lol…  Is that a common wargamer thing or am I just a nut?  Do you guys do that too?  Play games like Battle of Moscow, Bulge and Austerlitz in the winter?  Then Vietnam, Pacific, North Africa in the heat of summer?  We need to make a Normandy Pub Battle that you can play at the beach!


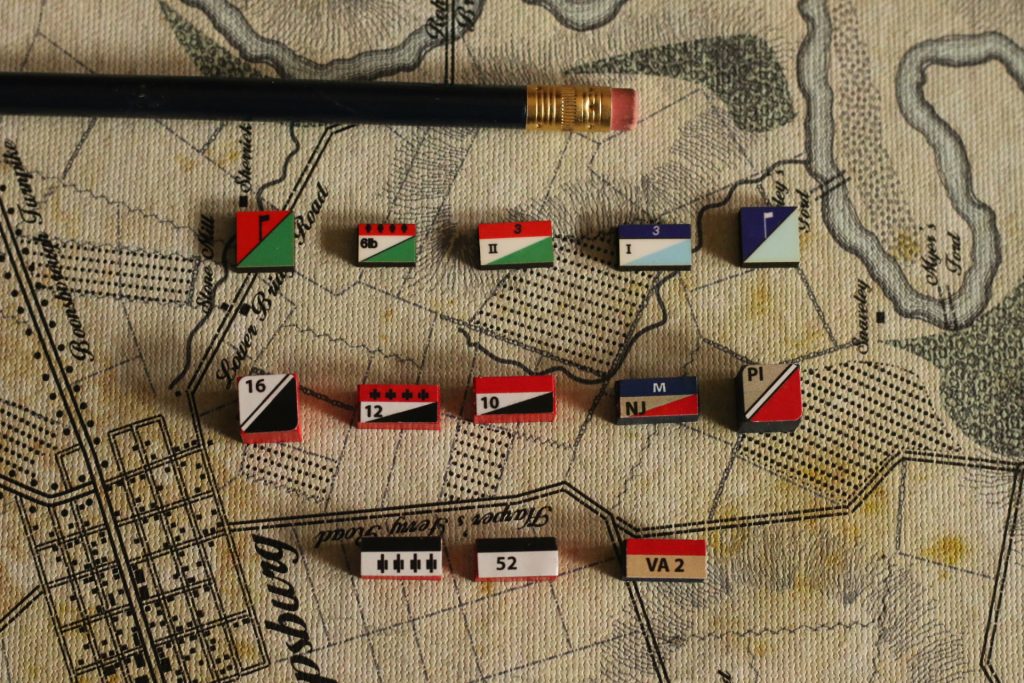
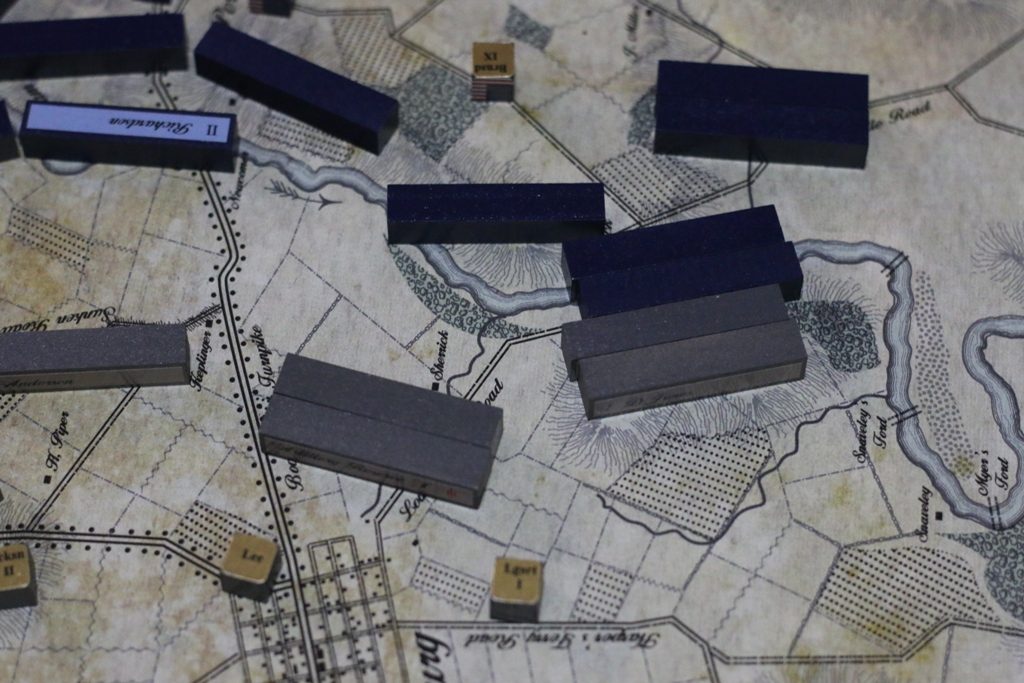
I digress.  So we are working on our new Bulge game.  For a starting map, we just printed off a real military map of the battle.  We’ve come up with an OB and made a set of Kriegsspiel blocks set to scale for Divisions. 


In the opening turns, 5th Panzer Army in the center, did well and broken open the front easily.  6th Panzer to the north got stalled and bogged down. 


As a wargamer, I figured no problem.  Next turn, I’ll just reinforce success.  I’ll peel all the armor off of 6th Panzer and shift them south.  Leave the infantry there to keep slugging away.  I don’t want to hold up progress.  It is critical to drive as deep and fast as possible in the opening of the operation. 


That is all true but there is a huge problem with this in the real world:  the unit boundary line.  You can’t just randomly send units willy-nilly all over the map on a whim.  All of those free SS Panzer Divisions can’t move there.  That is out of there area of deployment and chain of command.  They are in the 6th Panzer Army.  All the openings are in 5th Panzer’s area of operation. 


But 5th Panzer doesn’t have enough free units to exploit this opening.  I know!!  The technical military term for this is:  SNAFU,  Situation Normal, All F*#%ed Up. 


I suppose you could make a shift like this but it would take time.  Meetings, order changes, reassignments, etc.  By the time you go through all of that, it’s too late.  The open door has been shut. 


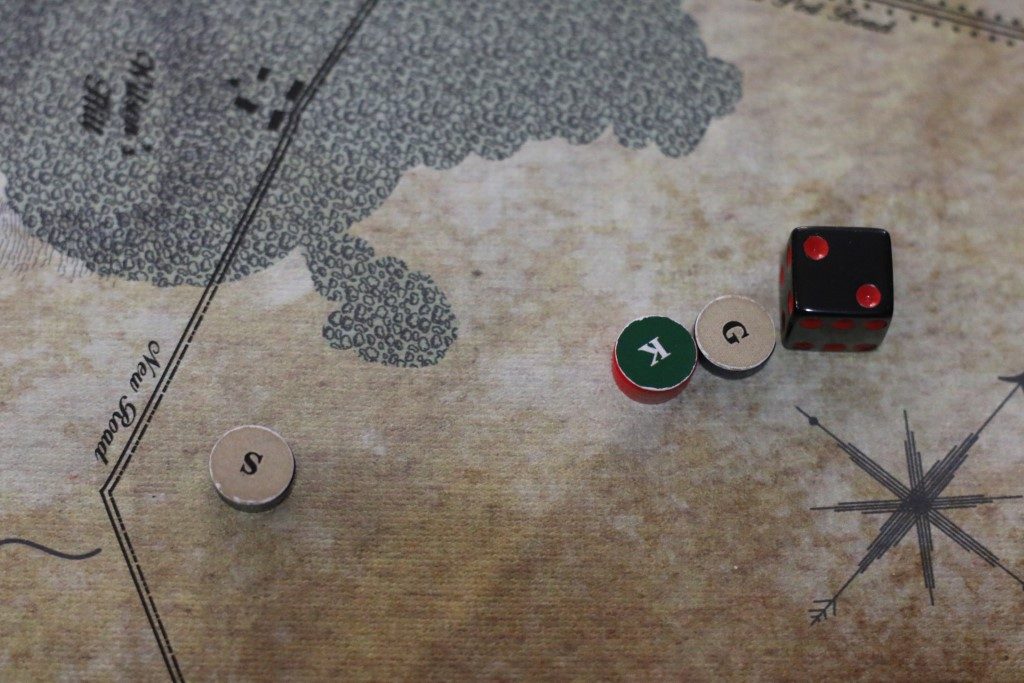
Here is another issue.  Look at the German 7th Army down here in the south:


5th Panzer in the center has broken out.  They are spread pretty thin and dangerously stretched out.  7th Army is all bottled up.  All those units sitting there with nothing to do.  Why?  Unit boundary line.  In fact, look at the unit boundary line drawn for 7th Army.  It is the long skinny one drawn at the bottom of the map:


By the way, that is Patton’s 2 Corps sitting off the edge of the map waiting to come in as reinforcements later.


How is 7th Army even supposed to do that?  They are supposed to drive long and deep.  Fine along what MSR (main supply route)?  Look at the terrain.  Up and down hills, over rivers, through woods, no we’re not going to grandma’s house.  Not a single road to advance along.  Luckily most of the Army is infantry.  They only have 1 armored division and 1 mech division for support. 


Also, look to the south of 7th Army.  Clear open sailing!  Instead of trying to slog along west, I really wanted to break out south into Luxembourg.  Guess what?  Can’t.  It’s beyond the objective boundary.  Sigh. 


Who in the world drew this boundary line anyways?  Imagine being the 7th Army commander here.  I’d be pretty miffed.  I would have protested this mission up the chain of command right from the get go.  How could 7th Army ever get anywhere with this objective?  Of course, protesting the feasibility of orders up the chain, through the German High Command at this time wasn’t very productive. 


All of this raises a number of questions:


1)      How important is drawing unit boundary lines in orders?  Is this seemingly arbitrary task much more critical to the mission success than we realize? 

2)      Strictly following the historical boundaries at the opening of the Battle of the Bulge seems to have a huge impact.  Did these boundary lines doom the operation right from the get go?  (in addition to all the other problems working against the Wehrmacht.)   Could simply redrawing these lines and adjusting the opening OB create much better German results?

3)      What is your experience in real world, military operations with this?  Have you seen boundary line issues cause a mission to fail?  How much planning, effort and thought is actually put into drawing them?  How could this be better?

4)      From a game design perspective, should wargames enforce proper phase line and unit boundary limits?  Would that make them more accurate and better models?  Would that ruin them as games and make them less fun?  Would they be more fun?

5)      From a military science perspective, what can we learn from wargames?  How could this be used in real world command to improve unit performance?  Are Phase Lines and Unit Boundaries bad?  How could you command and conduct operations without them?  What type of command system would it take to allow real world units to freely shift as needed along the front without time delay and confusion?


What are your thoughts?  Comment below:


Supremacy Alliances

Sure, I’ll be your Ally….    Why not?  What is there to lose?  What is there to gain?  I can still attack you anytime I want.  Players always talk about being Allies but it doesn’t really mean anything.


This is a problem that plagues most multiplayer games.  Players can say anything.  What will they do?  If they can betray you and attack you at anytime, what good is an Alliance?   

What if it did mean something?  What if they really couldn’t attack you?  It was in the rules!  What if you also really got something out of it?  You could combine forces and coordinate together for attacks.  That would make an Alliance truly powerful.  

We have developed some new optional rules that you can add to Supremacy.  They do exactly that.  They put real meat into an Alliance.  They can’t just betray you.  It is against the rules.  Are they still willing declare an Alliance?  This completely changes the game. 

Where can you get these new Optional Rules?  They are now included in our Diplomatic Kit.   


IF

You were a Supremacy Backer

OR

Previously purchased the Diplomatic Kit,

Send us an email and we will send you a copy of these new Optional Alliance Rules for FREE!!


Dracula’s Brother

In our times, we rely on family for support.  We help each other.  Encourage each other.  Family is your foundation to build a life and face the world.  In a Medieval, aristocratic family, they were often your most dangerous enemy.


Dracula was the oldest son.  The oldest son inherits the throne.  Radu was Dracula’s younger brother.  What does the second oldest son get?  Comparatively, nothing.  Unless of course, something happens to Dracula….  There are many examples from this period, of  brothers, sisters, uncles, etc. murdering the next in line for the throne.  Only 1 person standing between you and the throne is a huge temptation.    


If Radu was a lot younger than Dracula, he would not have been as much of a threat.  If Radu was patient, he would likely have his own reign of power later.  They were however, only about 6-8 years apart.  Getting rid of Dracula was Radu’s only real chance at power. 

Vlad Dracul II


Their father, Vlad Dracul, rose to the throne of Wallachia by promising to pay taxes to the Sultan of the Ottoman Empire.  To further ensure his loyalty, he surrendered custody of his two sons to the Sultan. While there, they were both raped.  Dracula was filled with fury and hatred for Turks and Islam.  Ever wonder WHY  he enjoyed sodomizing Muslims with a 20’ pole?  Impaling them to hang on display and watching them slowly die for several days? 


Radu however, responded very differently.  He embraced Islam, the Turks and the culture.  Radu willingly remained in the Ottoman Empire and even became the Sultan’s lover.


Dracula, embraced Christianity.  He hated Islam.  When he assumed the throne, he refused to pay taxes to the Sultan.  The Sultan sent 2 envoys to Dracula, ordering him to report to Constantinople to discuss the situation.  The envoys had secret orders to capture and kill him as he crossed the Danube.  The savvy Dracula learned of the plot.  He seized and executed the Sultan’s envoys. 


Instead of continuing to Constantinople, Dracula marched to the Ottoman fortress of Guirgiu.  In perfect Turkish, he ordered the commander to open the gate.  He did!  Dracula’s soldiers simply walked in and sacked the fortress.  He then began a rampaging campaign, devastating Ottoman villages along the border, for “honor and the preservation of Christianity”.


The only remaining option for the Sultan was war.  Imagine being the Sultan.  If you win the war and kill Dracula, who are you going to replace him with?  The younger brother Radu, is the natural choice.  It is a pretty easy offer to sell:   Now is your chance!  You will never rule otherwise.  Besides, by this time Radu was a loyal and trusted friend and lover.

Vlad Dracula III


Dracula ruled with an iron grip of terror.  His reign meant hardship, blood and war.  Radu promised the opposite.  Leniency, peace and prosperity.  Yes, they would have to pay taxes to the Ottoman Empire but in exchange, their economy would flourish with increased trade.  Dracula was harsh and uncompromising.  Radu was agreeable, pleasant and diplomatic.  Wallachians weary of war, gradually switched allegiance to Radu.

Radu


Though Dracula fought and won many spectacular battles, overwhelming numbers forced him to withdrawal to the mountains of Transylvania.  He persisted in a guerrilla campaign but eventually gave up, seeking refuge in Hungary. 


Radu became the new ruler of Wallachia.  He remained in power for nearly 10 years.  He fought several campaigns against his son-in-law, Stephen III, who eventually defeated and executed him. 


Violent times, even for an agreeable and pleasant ruler.      

Dracula is Now Shipping!

Kickstarters are shipping.  The regular game is now available for purchase.  Check out Dracula:  Forest of the Impaled.

Affectionately dubbed ‘Risklvania’, this game is an interesting mix:

Things in common with Risk:

  • Short rules.
  • Easy to learn and play.

Things different about Dracula:

  • Short play time: 1-2 hours.
  • No player elimination.
  • No ‘Kingmaking’ or ‘prisoner’s dilemma’.

Instead, this game focuses on teamwork and communication.

Tracking Time

What is the Black die for?  Tracking time.

Play testing revealed that counters on turn tracks can get easily dislodged by unruly die rolls.  Counting turns with a big square die was much more stable and reliable. 

 What happens after turn 6?  Easy, just keep rotating.  Turn 7 would be a 1.  Turn 8 would be a 2 and so on. 


 While we are on the topic, how do you track commands for the turn?  You are of course free to do this anyway you want to but this is how we do it.

 We place chits near to turn die after they move.  If you string them out in a line, you have a record of who moved in what order. 


 We like to keep the pulled chits that haven’t moved separate, so it is easy to track where you are.  In this example, Greene and Knyphausen have already moved.  Sullivan was pulled to move next but he hasn’t moved yet.

Cornwallis successfully rolls to jump ahead.  So then we place his chit here:

 Sullivan rolls to jump ahead of Cornwallis but fails.  After Cornwallis actually moves, we would slide his command chit over like this:

Battle of the Bulge -scale

What scale of units works best for Battle of the Bulge?


Well it’s a cold snowy day in December.  Christmas is just around the corner.  The perfect time to have a cup of hot tea and work on our new Battle of the Bulge game!


This is just a crude, graphics / color test;  not the final game.  We do have the map scale and scope worked out.  I’m wondering what size of pieces work best for this map?

Each piece represents a Division.  These blocks are half Pub Battles size:  1″ x 3/8″.  The Germans are represented with the correct starting OB here.  The Allied forces are not!  I just put a few random blocks down on the map for a reference.

Our other option is to use small Kriegsspiel sized blocks.  These are about half the size of the big ones above:  1/2″ x 1/4″.


Of course the Allied blocks would be sized down to match the Germans.

Which would work best for the game?  Leave us a comment!


New Kriegsspiel Scenarios

The Kriegsspiel system is fantastic but where can you get games?  Well, it’s not easy…

You can get the rules from Too Fat Lardies.  They have done a beautiful job.  They have a few map options but that is about it.  Mostly Kriegsspiel players are left to their own devices to come up with maps and scenarios.  That’s possible but very time consuming.

We have been hard at work lately exploring ways to produce historical Kriegsspiel Scenario sets:  Maps, pieces, setups, starting orders and OB charts to track strength and casualties.

Here are some sneak peaks at the Brandywine scenario.  This is set to true Kriegsspiel scale:  8,000:1.  The OB and pieces are historically accurate.


The Best Kriegsspiel Pieces

Which Kriegsspiel pieces are the best?  Help us decide.

We’ve been working on production of all new Kriegsspiel sets of pieces, maps and historical scenarios.  We need some help figuring out which style to make.

  • The top row is the Too Fat Lardies style,  -laser cut counters.
  • The middle row is our new block pieces styled with the diagonal look.
  • The bottom row is an alternative design for a rectangular look.

Our Question is:  Which is better, Diagonal or Rectangle?

The diagonal lines look detailed and refined.  I like the over all look better.  The down side is that diagonal line on everything can be confusing.  Especially to us modern players used to NATO symbols.  No, these aren’t all cavalry pieces.  The Cavalry pieces are the square shaped ones on the ends.  The rectangle ones are infantry and artillery.

Is the diagonal design more historical and traditional?  No, it’s not.  We’ve been researching this.  Looking at old military maps and antique Kriegsspiel sets, we saw about 50/50.  Some have all rectangles, some have diagonals.  There wasn’t really a standard.

I feel that going with the bottom stickers would be easier for players today to use.  I also like how the font size on this bottom row can be a little bigger.  Much easier for my aged eyes to make out.  🙂  Apart from my weak eyes, I like how we can fit more visible text here for unit names.  I also like the long horizontal line.  Instantly makes me visualize rows of troops.

My only complaint against the bottom row really is aesthetics.   They just look kind of plain and stark to me.  I like the look and appearance of the middle row much better.  The big tall cubes also make the cavalry stand out easily and contrast with the sea of diagonals everywhere.


What are your thoughts?  Which would you rather have?  Do you have any other ideas or suggestions?  Comment below or send us an email.


Command & Control at Antietam

How does Command & Control work at Antietam?  Instead of explaining the rules, here is a good example to show you:


Burnside attacked across the bridge in turn 2.  He was driven back but Jones is now spent.  We are at the beginning of turn 3. 

In this case, Longstreet and Burnside both want to move first.  Half of Burnside’s Corps is spent but he still has 2 fresh units to attack with.  If Longstreet can move first, he can rally Jones BEFORE Burnside can strike. 

If Burnside attacks first, Jones can’t rally.  He must either fight against 2 fresh divisions (good chance of dying) OR fall back.  Falling back is sensible but you would also be giving up your good defensible terrain and allowing the Potomac a bridge head across the Antietam.  –A very bad position to be in on turn 3!

Should you roll now to move first?  No.  This will waste your HQ roll.  Better to sit tight and see what happens:

Wouldn’t you know it, Burnside gets picked to move first.  Disaster for the Rebs?  Not yet…..  This is where the HQs come in.  Longstreet can roll to jump ahead of Burnside.  He needs a 1-4.

Wouldn’t you know it, he fails.  It happens.  Now what?  Game over?  Nope.  Keep your shirt on.  That’s why you keep your Army HQ in range of your Corps HQs.  Lee can do this easily at Antietam.  He has relatively short interior lines.  He also only has 2 Corps to deal with. 

Lee now rolls to Jump Longstreet ahead. 

Success!  Now Longstreet will move first, THEN Burnside.  

Ok, disaster averted?  Not so fast.  The Potomac command hasn’t weighed in yet.  Their HQs can roll to alter this too.  It is harder for the Federals in this battle.  They need 1-3. 

Burnside swings a misses.  Good.  Are we in the clear now?  Nope.  McClellan can roll just like Lee did for Longstreet.  Well, not just like Lee.  He needs a 1-3.

He pulls it off! 


Note what makes this roll possible is that McClellan is both Fresh and in range of Burnside.  It is much harder for McClellan to pull this off than Lee.  McClellan has 6 Corps on the board now with a 7th arriving later.  They are also scattered along a much bigger frontage.  McClellan is able to roll for Burnside now because he is nearby.

Also note the opportunity cost of this.  Staying close to Burnside, means that McClellan is out of range to influence the whole right side of the field.   


Ok, so now where are we?  Can’t we just have Lee roll again?  No.  Only Fresh HQs can roll.  Rolling causes your HQ to become Spent.  It will become Fresh again at the beginning of next turn but that won’t help you now. 

So does that mean we are done and the poor Rebs are about to have a bad day?  Not quite.  There is still 1 more trick up our sleeve.  It just so happens that DH Hill is east of Shaprsburg.  He is in range to help Jones.  The key thing here is that DH Hill isn’t in Longstreet’s Corps.  He is in Jackson’s!  Jackson’s HQ is still Fresh, so he can roll and he does:

Success!  This allows Jackson’s II Corps to jump ahead of Burnside.

What will this do for us?  Jones will still move after Burnside but this allows us to move DH Hill forward to block for Jones.

Next Burnside will move.  He will attack with his lead units and rally his reserve. 

Finally Longstreet moves.  Since he’s not in contact, Jones can now rally.  The tables are turned!  Instead of attacking 1 spent defender, Burnside runs into to Fresh Divisions, across a bridge, on top of a hill.  Not good for the poor Federals. 

Alright you say, clever trick.  What about the Potomac?  Can’t they just do the same thing?  Can’t they just roll in another Corps to jump ahead of Jackson?  Theoretically, yes they could.  The problem is in this case, there are no other Federal Corps in range that could get there.  I know, it’s that darned interior lines advantage again! 

One more thing to note here.  What about the opportunity cost for Jackson?  Yes, this was a clever little trick.  The ANV has used their superior C&C to out position the Potomac once again but this does not come without a cost.  Jackson is now spent and this is only the first couple of chit pulls for the turn.  What is going on in his half of the line?

If a critical emergency like this develops for Jackson’s Corps, he and Lee can do nothing about it.  They’ve been tied up putting out Longstreet’s fire.  Jackson’s boys are going to have to deal with whatever the chit pull gods throw down on them.  I hope they are already in a good position to handle it.

Imagine if they weren’t?  Imagine if they were also facing possible disastrous pulls like this on their side of the field?  What does Jackson do then?  Does he let Longstreet get whacked and save his HQ roll for his own troops?  Which emergency is more important?  Time for the Scotch.

Solitaire Suitability


This is why Pub Battles makes such a great solitaire system.  Look at all the head scratching decisions this forces you to deal with.  Struggling with all of these conundrums is very interesting and rewarding as a solitaire game. 

Multi Player


Surprisingly, it makes for a great multiplayer game as well.  Imagine  playing through this same situation with other live players.  Imagine that a separate live player is Longstreet.  You are Jackson.  You can watch and see all these events unfolding with Burnside.  The only problem is:  You can’t communicate with Longstreet! 

You can’t strategize and work out the best course of action here.  He can’t say, “Well, don’t worry about me.  Your problem is much more pressing.  I think I can handle this on my own.”  OR “I don’t care what you have going on, if you don’t help salvage this now, the battle is lost!”  Which one is he thinking?  What is your assessment?  Agonizing fun!

I know it’s hard to get other wargame players.  It is way worth the effort here.  You also have 2 big advantages working in your favor:

  • It’s easy to learn.
  • It plays fast.

Lessons from Gettysburg

Notes from the Design Table


First of all, this is coming together way faster than I expected.  I didn’t think this would be ready till next summer.  We might be done much sooner.


Losses Not So Bad


This battle is giving me a much different view of casualties.  When a unit is destroyed, that doesn’t mean 100% casualties were suffered.  In real world terms, it means that 50% casualties were suffered which renders the unit 100% ineffective.  Some of those casualties are lost stragglers.  Some have minor wounds.  They will return to the ranks overnight. At first, I thought I had suffered catastrophic losses on day 2.  There is no way I can continue this battle.  Maybe this combat is too bloody.  I resolved the whole battle in 1 day!

Wait a second.  Put half of those guys back on the board and flip everybody up to fresh again.  Oh.  Ok.  That’s not so bad.  That looks about historical.  We can fight from here.

Lesson learned:  All those guys in the dead pile?  They aren’t really dead.  Half of them spring back to life for the next day.  You’re probably ok.


Nice to Have Options


I love the scope of our new map.  Most maps here cut off at both historical flanks.  Ours is open.  It allows you to explore all possibilities.  Turn their flank on the left or right.  You can try.  Realistically, you probably won’t do it.  I like ‘not doing’ it because I chose to, NOT because some game rule or map MADE me do that.  Big difference.

What is also cool about this, is also the possibility of a Confederate side slip to the right.  We are designing this with the possibility of a Pipe Creek defense later as an expansion.  Don’t want to defend in Gettysburg?  Fine.  Fall back to Pipe Creek.  First day is a total disaster?  You lost Cemetery and Culp’s Hills?  Fine.  Fall back to Pipe Creek.  Confederates were able to side slip to the right and skip out south to Taneytown?  Now you better skedaddle down to Pipe Creek!


Interior Lines of Communication


At Antietam, Lee only has 2 Corps.  They are somewhat mixed and Lee can be in range of both of them.  Confederate HQs are rated higher than the Feds.  On top of that, Lee almost always can weigh in with a second opinion when it comes to jumping ahead of a move.  🙂

At Gettysburg, a much different story.  So far we are using all HQs rated the same.  Still, it’s a huge difference.  Mead is on the inside of his fish hook.  He is in range of almost all his Corps.  He also has many Corps to respond with.

Lee only has 3 Corps.  Along the longer stretching lines of communication, which Corps is he able to influence?  Usually the wrong one.

So Pender launched an attack on Cemetery Hill.  They got lucky and forced the Federals back.  In Pub Battles, that doesn’t mean you’ve taken the Hill!  It means you have shoved them back and now have a ‘chance’ to take the hill.

The next turn is a race to see who can get back up on Cemetery Hill first!  The Confederates have 1 roll to jump ahead and get there:  The Corps Commander.  Is Lee in range?  Probably not.

How many Federal Corps can get there?  Almost all of them in one way or another.  So there is about 4-6 rolls.  Can Mead roll also?  Yes.  He is in range of just about everybody.  Easy.  Who is going to get back up there first?  Most often the Potomac.  Why?  Because of interior lines.


Keep in mind that these are very rough and crude play test maps.  NOT the final version.