Hidden Reserves

We love Columbia Games.  Great company.  Great products.  We whole heartedly support and endorse them.  They blazed a lot of new ground in wargaming ‘technology’ with their hidden blocks for Fog-of-War (FoW).  They have made some of the best games ever. 

We didn’t want to just copy Columbia Games.  We wanted to break new ground.  We like the look of the long, rectangular Pub Battles pieces.  Unfortunately, they aren’t quite as good as Columbia for FoW.  They do conceal type, command and quality but this doesn’t generate the same level of fear, like most Columbia games.  Is that a 1 strength infantry or a 4 strength SS panzer?  Big difference.

We have been experimenting with all kinds of different systems to achieve this with Pub Battles.  We finally hit the right combination.  I am very excited about this Variant.  This elevates Pub Battles to the same unknown, Kriegsspiel type FoW,  as Columbia Games.  THIS is what we’ve been looking for. 


This is what the board looks like:

What is really there?  This:

Or this:


Hidden Reserve

HQs can act as a Reserve to hide pieces from the enemy.  Pieces can move into Reserve by moving into the HQ.  Remove them from the board while in Reserve, as long as the HQ cannot be Spotted by the enemy.  To move pieces out of Reserve, put them back on the board at the HQ and conduct a regular move.

Simply track which pieces are in Reserve with which HQ by noting them on paper.  An easier way is to hide them under a folder sheet of paper (or cards stock) with the HQ name written on top.     

The HQ marks the location of pieces that are closest to the enemy.  Consider all pieces in Reserve to be within 1/3 Cav move at or behind the HQ (away from the enemy).

While HQs hold pieces in Reserve, they can only move at the speed of the slowest piece they hold.

Pieces can begin the game in Reserve.

Army HQs can also hold pieces in Reserve.

While a HQ is spotted by the enemy, all of its Reserve pieces must be placed on the board. 


Spotting & Line of Sight

Pieces can see up to 1 mile in clear weather. 

Woods, Buildings, Hills and enemy units block line of sight.  You can see into Woods and Buildings up to the thickness of a piece: 3/8”.  You can see onto a Hill up to the center crest line.     

Consider these obstacles to be the same height.  So a piece on a Hill could see over Woods or Buildings to a target on another Hill, up to the crest line.  If the target was not on a hill, it could see them if the target was further away from the obstacle than the observer.  

Reassignment

This requires a little more work but greatly increases the darkness. 

Before the game starts, you can reassign pieces to other commands.  Simply note which units are attached to which commands.  Treat them as a regular part of that command for the entire game. 

Limits:

Every Command must have at least 2 pieces.

The number of pieces in any Command cannot exceed the largest historical Command of that army. 


Add in multiple players with limited communications and you are very, very close to a real Kriegsspiel without an Umpire.  

Disengaging from Contact

Turns in Pub Battles are fluid and abstract.  They are not I-Go-You-Go.  We consider all units to be in motion at the same time during the turn.  This is why we don’t resolve combat until the end of the turn, after all units have moved. 

This can be confusing at first to experienced wargamers, used to standard games.  This is a common question:

The enemy has advanced to contact me.  If I move next, I can turn and run away with no combat.  Is that right?  Why?


Yes, that is correct.  The short answer is:  Because you never were in contact. 

What? 

Here is an example to help you visualize what this represents:

A British unit moves to contact your Colonial unit.  What does this mean exactly?


Imagine being the Colonial Commander.  You can see the British forming up and preparing to attack.  Do you want to receive the attack?  Yes.  Fine.  Do nothing.

Option 2:  You don’t want to receive the attack.  You are on weak ground and don’t intend to fight here.  The British have already started forming up and are starting to advance.  You want to fall back 200 yards to a better defensive position.  You hurry and shout out quick orders to fall back.  How quickly will those orders be implemented?  Will your command respond quick enough to execute this and start falling back BEFORE the British close and start firing?  This is a crap shoot.  Who knows?  Maybe.  Maybe not.  Depends on a lot of things. 

In the game we simulate this with HQs rolling to Alter the turn sequence.  (In Pub Battles you can roll to jump ahead of the next move or delay your move until later in the turn.)  Maybe the British move quickly and your troops respond too slowly.  Your line gets hit before it can fall back.  In game terms, this means you tried to delay your move so that you could respond to the British but you failed.  Now you must fight as is. 


Instead, maybe your men moved quickly and the British dragged their feet.  You pulled it off.  Your men fall back into a better position before the enemy strikes.  The Brits advanced to your previous location  -According to their orders.  Now they hesitate for a moment because they aren’t sure what to do.  In game terms, your HQ delay roll was a success, you move last.  The British move up to contact, you fall back quickly and avoid a confrontation.  –for now anyways. 

Why is there no combat?  Because you never were in contact.  You just successfully fought a delaying action.    


This same concept applies to calling in support.  Let’s say you don’t want to fall back.  You need to hold this position.  You aren’t sure where the enemy is going to attack.  This is why you keep troops behind the lines in reserve.  If the British attack you at this point, are you able to bring up reserves in time to bolster your defense?  It depends.  Who moves last?

If you can successfully delay your move, you can see where the British are attacking and then commit reserves at this point BEFORE combat resolution. 

If you fail the roll you are stuck.  You are forced to fight at the time and place the British choose. 

In real world terms, this simulates how quickly you were able to respond AFTER you saw that the British were attacking.


As you might imagine, HQs have different ratings.  So fast movers like Stonewall Jackson and Napoleon can manipulate these turn sequences with relative ease.  For others, it may be a long shot. 

Sticks & Chains

The sticks are expensive to make but the game should come with something to measure shouldn’t it?  We’ve been working on this and have found a good solution:   Chains. 

These are cheap enough that we can include them for FREE with each game.  Some people still prefer the sticks or compass.  That’s fine but they are optional.  We don’t have to make everybody pay for them.

I like the chains.  One advantage is that you can easily lay them out along roads to more accurately measure distance. 

They do require some assembly.  Put the gold in the center with the clasps.  Dark on the outsides.  Short gold with short dark.  Long gold with long dark.  If you did them right, they should line up with the measuring distances shown on the Terrain Effects chart. 

Easy!

An Unclear Game is Good

We’ve gotten some ‘complaints’ that the map for Marengo is unclear.  It occurs to me that this is by design and that it is a good thing.  What?!

This is a great illustration of the different philosophical approach of Kriegsspiel vs modern wargames.  Yes, we want the map to be unclear.  To some extent, we want the rules to be unclear.  This is by design and we love it.  


“I can’t tell where the streams are.  Which lines are they?”

” I can’t see where the roads are.  Some of them fade out.  Some of them look like they don’t connect.”

“Roads approach this river from both sides but there is no bridge or ferry symbol.  Is there a crossing here?”

“These hatch marks for the Hills fade in and out.  They don’t connect to anything.  There are multiple little ones together.  Is this all one slope are a series of small ones?”

“What do these little dots mean?  Some kind of scrub vegetation?  What does it do?  The rules don’t say.” 

“Why do these roads look different than those ones?”


These are common questions with Pub Battles.  No, we are not going to answer all of these in mind numbing detail with a 100 page, fine print rule book.  Yes, that is what has commonly been done in our industry.  That doesn’t mean this is the correct or best thing to do.  I’ll argue that it is wrong or at least that there are other ways.

The map for our Marengo game is REAL.  It is really cool from a historical perspective to play the game on a real French map of the period.  It is also more accurate and realistic.  It is messy.  Yes, it raises all those questions above and more.

As players, you may spend some time looking carefully at the map and trying to figure out what all this is and how it should impact the game.  Guess what?  You are spending time doing things that the real commanders did.  You are learning and developing skills that real commanders had.  You are learning to think like a real commander in a real battle.  


What would you spend your time doing in a traditional wargame?  Analyzing hexes, counting MPs and totaling odds for CRTs?  What skills are you learning?  Mechanical gaming skills for a certain type of game.

So if the rules don’t say anything, how do you decide what the map means?  You analyze it and discuss it with your opponent.  I am spending my time thinking about history.  What would have happened? How did things work?  If a division came across terrain in the real world like this, what would they do?  I am spending my time discussing military history and tactics with a friend.  That IS our hobby.  That IS fun.  I’m spending time with a friend discussing and learning about what we both love:  Military History / Science and command.    

There is a  road on both sides of the river but no bridge, ford or ferry symbol.  What do we do?  Well, apply a little logic.  Why would they build a road that approaches both sides of the river, at the same point, only to dead-end into the river and just stop?  That doesn’t make much sense.  Most likely, there is some kind of crossing there but it wasn’t put on the map.  Why?  Because it is the real world and it’s not perfect. Do you ever think that happens in real war with real maps and real commanders?  Do you ever think something like this has come up and messed up a whole operation?  All the time.  The military even has an affectionate term for it.  It’s called:  SNAFU.   

Maybe they forgot to draw it on the map.  Maybe the ink didn’t stick there when the map was printed.  Maybe high water recently washed out the bridge, so there is no crossing there right now.  Who knows?  Make a decision and go with it.  What if you disagree with your opponent on how to interpret the map?  That ruins the game!  How do you resolve it?

Flip a coin.  Ask an innocent bystander to make a ruling for you.  Does it really matter?

Why are you playing the game?  Are you playing to learn about history, learn about the time period, learn about command, spend time having fun with people that share your same interests?  Isn’t trying to figure out what the map means doing that?  I’d argue that doesn’t ruin the game.  That IS the game. 

Are you playing a game to competitively ‘beat’ somebody and claim some kind of superior intellect or skill?  I could argue that THIS ruins the game.  100 page, fine print rule books ruin the game.  How much has our hobby been damaged by this type of thinking and approach?

What has higher sales?  The average wargame that rolls off the line or Dungeons & Dragons?  Guess what?  Do you know what the original Kriegsspiel was like?  It was a lot more like D&D.  What if wargaming was more like D&D?  Would our hobby grow and be stronger?  More accessible to new comers?  


No bridge was depicted on the map.  Several players are in disagreement on how that should be interpreted.  What would happen in D&D?  The Dungeon Master would set a percentage and roll a die.  There’s the answer.  In Kriegsspiel an Umpire would do the same thing.  If you don’t have an Umpire in a Pub Battles game, roll a die.  

Guess what?  The best REAL training by military officers are Command Post Exercises.  These are run like Kriegsspiel.  Like D&D.  It’s not about counting hexes, calculating odds on CRTs and looking up mods on charts.  It’s about reading maps, teamwork, communication through limited written orders and reports with timing delays and hidden intel.  What does that little dot on the map mean?  Who knows but you have 3 min to make a decision and get your next order out.


Is Pub Battles unclear?  Yes.  The maps are a bit unclear.  The rules are a bit unclear.  They are that way by design.  Bad rules are 100% clear.  Our goal is NOT to answer any possible question, any person could possibly ever have.  That results in bloated rule books to games  that never get played.  

Our goal for rules are to be short, concise and easy to reference.  Our goal is that they should answer most questions that most people need;  not explain everything.  

Our goal for wargames is to push them more in the direction of D&D, Kriegsspiel and Command Post Exercises;   To make them more about communication, teamwork and leadership.  I believe this will make wargaming both more fun and realistic.  I also think this can greatly expand our industry and hobby.    


One final point.  I don’t mean to slam all traditional hex & counter, CRT wargames.  I like them too.  I play them.  I grew up on them.  There are many great ones that do many great things.  Don’t get me wrong.  

I’m just trying to point out that there is another path, and that other path has many great virtues as well.  I also think that in our industry, this other path is greatly undeveloped and under-represented.  


Antietam Contest Answer

First of all, I’d like to point that this contest is a great example of a Multi-Player game.  It is a total mess!  Pub Battles can be a great and rewarding solitaire game.  It is even better if you can get more players together to play in teams. 

At first, you might think that there isn’t enough to do for a player.  If all you do is run 1 Command, that means you only control 2-6 blocks.  How can that be a game?  Because of this!

Yes, it is very different from the types of wargames we are used to playing.  We are used to controlling hundreds of pieces by ourselves.  We can do everything and have perfect control.  The game isn’t moving your pieces.  It is communication, teamwork and accomplishing the objective anyways.  

I suggest that real command is a lot more like this contest.  It is also a lot more fun.  It is also easier for more people to do and join in.  You don’t control everything.  You aren’t responsible for everything.  You only control 4 blocks.  You are on a team trying to defeat the enemy but you can’t talk. 

Yes, you don’t have tons of pieces to control.  There may not be anything going on in your sector of the battle for awhile.  I submit that the issues like this that you have to wrestle with can be just as engaging and even more fun.  –Especially when you can watch the whole board.  You can see what needs to be done.  You can see what everybody is screwing up but you can’t talk about it.  You can only control your 4 blocks to the NE.

I can’t over emphasize how GREAT this is.  Looking back over my entire life of gaming, I have 4 great moments that stand out.  Moments that we remember vividly and still talk about with excitement years later.  Three of them resulted from a Multi-Player, Pub Battles conundrum like this with limited communications.  (the fourth involved a player announcing a 12 ICBM launch in Supremacy)

I know it is hard to round up players.  I urge you to make the attempt.  It is worth the effort.  Pub Battles is a simple game.  How hard can it be if you only have to control 4 blocks?  If you are a newbie, you can’t do too much damage with that, right? 


Ok, so enough preaching.  What is the correct answer?

Although I am partial to answer number 2:

“2.  Write a letter to President Lincoln, asking him to remove McClellan from command for incompetence and give the Army of the Potomac to you.”

Answer number 1 is the best answer

“1. March SW and attack the 2 Confederates to the West near the river. (far left)”

I would also do part of 7: 

“7. request clarification”, and inform McClellan of my interpretation of his orders and current action. 

Followed up by number 11:

“11. Sigh and open a new bottle of whiskey.”


To refresh your memory, you can see the original contest here.

Do you agree with this answer?  Why?  Why not?  Join the discussion below in the comments.  


Waterloo Color Test

Ok, I couldn’t stand it anymore!!  Seeing all those blue and grey blocks for Antietam sitting there next to the red British blocks for Brandywine, I couldn’t stop thinking of Waterloo.

So last night after work, I created a 1st draft set of Waterloo blocks.  (Yes, that’s what I do for fun!)  The French are already set.  We’ll do the same colors and style from Marengo.  I think the Prussians look good.

I’m not sure about the British.  What should the colors be?  How do these look?  Any ideas or input?  Leave us a comment.  


This British army looks like a hodge podge mess.  Lots of Militia grade units.  It seems like they are coupled with Elite British units.  This automatically makes me start thinking of how you would use this army in Pub Battles.  

With hidden intel, it’s going to be a crap shoot for the French.  Is that an Elite British unit you are attacking or an allied Militia?  

As the British, I think I would want my Elites up front with the Militia in support.  This is going to look tougher to the French than it really is.  Once that front line cracks, you are going to be in big trouble and forced to fall back with the British before your whole army disintegrates.  

Very interesting….


AAR -Supremacy Fortuna

I really like the new Fortuna expansion.  It doesn’t look like much but boy does it make a difference.  Check out the recent AAR we got.  It almost sounds like the real world.  The new Fortuna rules really brings things to life.  It is my favorite expansion!


Supremacy 2020 – game imitating global geopolitics


Epic global diplomacy/war/economic trading as the European Union acted to save Africa and the Middle East from an outbreak and later invaded Poland, Syria and the Sudan, Japan lost its company in Venezuela as Chavez armed the nation with a black market nuclear weapon seized and nationalized their economy, whilst the Russian Federation angered by China’s arming the Koreans rolled their tanks into China, the Commonwealth were the only ones to develop nuclear weapons and launched into Beijing nuking the areas there and destroying the Russian army group and did a naval invasion of St Petersburg.

Meanwhile the Russians invaded Turkey from the Caucuses to take over the company there for resources. Since the early discovery of valuable oil in Iran, which was in precious short supply, had the Commonwealth arm the Shah of Iran in exchange for oil supply contracts to protect their interests there.

The USA, crossed the Rio Grande and took out Mexico’s forces with fighter air power and won the game through the highest net worth and wily diplomacy and economic development of companies around the world.

-Irving S

Little Bighorn Review

This Custer game, in particular, is one of the best Little Bighorn board games that I have played, and I have played most of them.

I wrote a review of the game and posted it on Boardgame Geeks, hopefully it will encourage other gamers to try the game.

The game design was excellent, simple but capturing faithfully the nature of combat between the cavalry units and their Sioux opponents. Very well done.

Thanks,

Tom D


Little Bighorn is a fast-paced and interesting game of Custer’s famous fight on the Little Bighorn. It is one of the most interesting Little Bighorn games that I have played, and I have played most of them.  A deceptively simple game system recreates the difficult tactical choices confronting Custer and his command, and allows players to explore the consequences of different decisions. 

A note of caution here – while this game is marketed as a “Pub Battles” game, it actually has a completely different and unique game system, designed specifically for the Custer fight. It makes for a gaming experience that is distinct from other Pub Battles games, and is fascinating in its recreation of the swirling, unpredictable fights along the Little Bighorn.

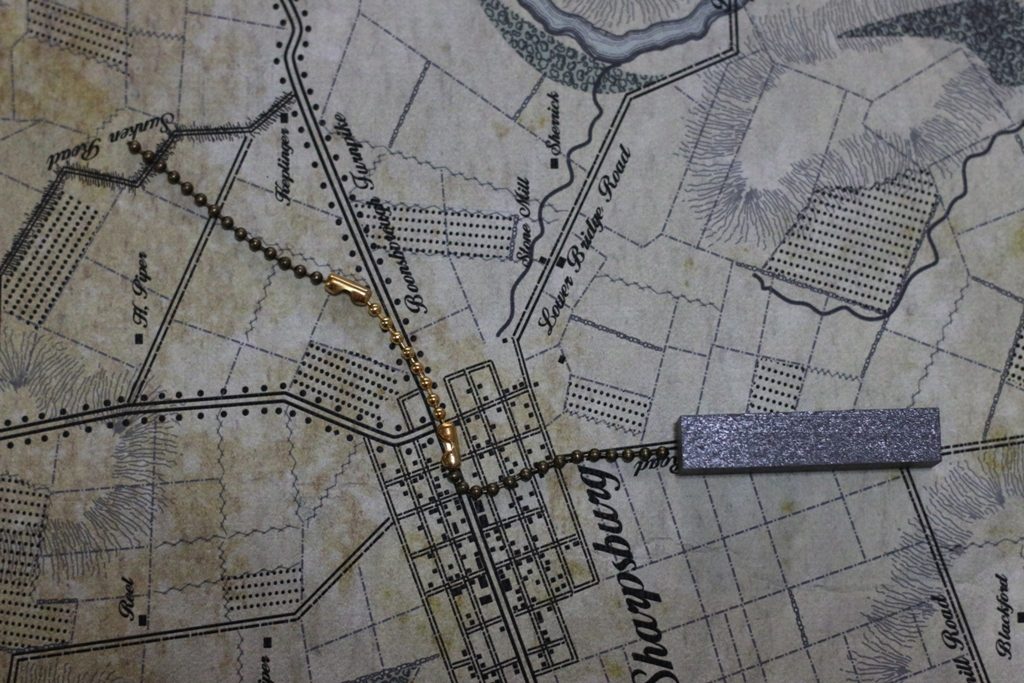
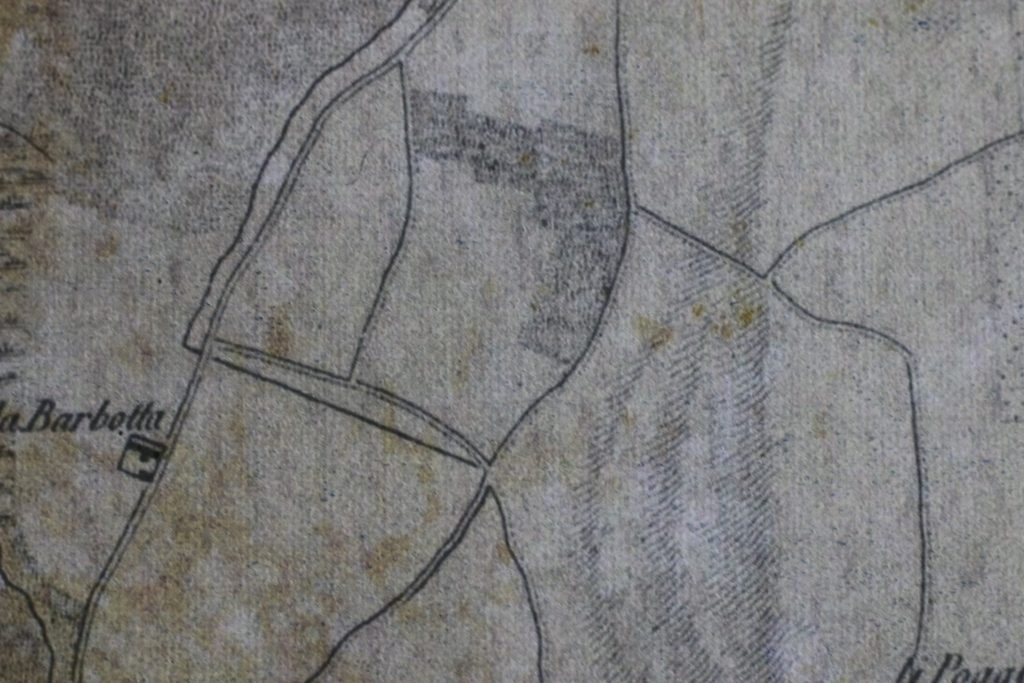
The game has one of the best maps I have seen of the Custer battlefield, accurately capturing the military significant terrain and identifying key landmarks. This is not a small thing – maps of the battlefield as it existed at the time of the fight are notoriously problematic, and this one is outstanding, as well as being a real work of cartographic art. Battle enthusiasts will enjoy acquiring the game for the map alone.

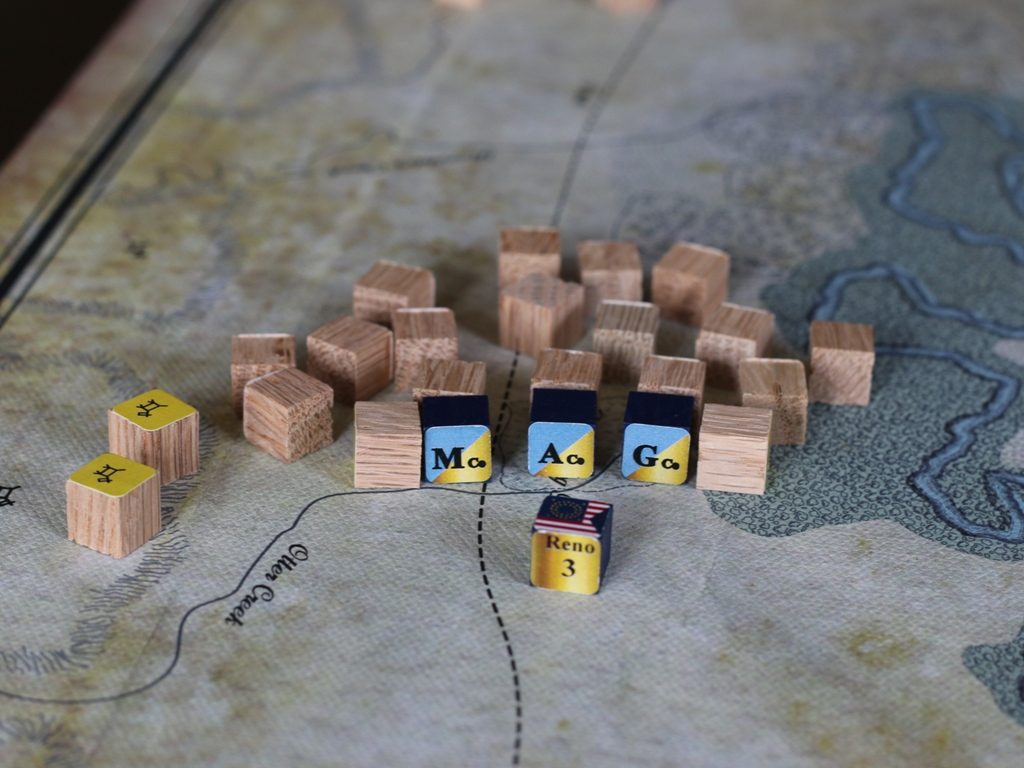
The game avoids traditional hex-based systems altogether. Movement is regulated by a simple combination of distance, facing, and terrain, using measuring sticks (take note – the measuring sticks must be ordered separately, although it is fairly easy to make your own using the movement gauges printed in the game rules). Units are small blocks of wood, representing companies (and battalion headquarters) for the cavalry and small groups of warriors for the Sioux. The Sioux are grouped into seven identical “tribes.”  Each tribe also includes a critical “Noncombatants” unit, capture of any one of which will end the game (and usually result in a victory for the cavalry).

Some historical purists will object to the absence of tribal designations, and the identical nature of each tribe. Some other games have very specific Sioux orders of battle, with differing strengths, combat capabilities, and including key leaders and arcane leadership rules. In this case, I think the simpler approach is better. The truth is we have no idea who was really at the battle on the Sioux side, or what their strength, equipment, or specific capabilities were, other than in the most general terms.

The key component of the Little Bighorn system is its variation in how many tribal encampments are actually present, from a minimum of one to a maximum of seven. This critical feature accurately reflects what Custer expected to find in the valley – a series of villages, of varying size, strung out up and down the valley. The Sioux had never in living memory or oral tradition – ever – summered in a single large camp, for several very good reasons, sanitation and grazing for the huge pony herds among them. Custer expected to encounter several villages, and was probably hoping to round up two or three of them at most, declaring victory and escorting the captured tribes to the nearest reservation.

The Indian player determines prior to the game how many tribes will be present, and where. He places a single tribal marker on each of seven camps; the cavalry player will not know which markers are real until he has a unit within “spotting” distance of the camp. For their part, the Sioux cannot move until turn 4, and must exit their noncombatants off the board through two exit points on the northern (downstream) map edge. Since the cavalry enter from the south (upstream) edge of the map, the cavalry player must be able to get a force north of the village before the Sioux can get rolling after turn 4 to have any chance of victory.


Rules are simple and easy to apply, making for fast moving games that are easily completed in the advertised 1 to 1.5 hours. As with other Pub Battles games, the game is divided into a movement phase, during which each of the Army battalions and each Sioux (and Cheyenne, to be accurate) Tribe moves according to a random “chit” draw, followed by a combat phase.  The Army (only) can attempt to pre-empt the Indians in the movement phase, either by forcing Indian units to move first, or by moving first with one of the cavalry battalions.

 Combat results are generated by simple (and simultaneous) die rolls, using two dice per unit, with “hits” scored on a four, five or six. Complicating this process for the Indians is their treatment as “Militia,” giving the Army a significant combat advantage. The significant numerical superiority enjoyed by the Indians (even if only two or three tribes are present) can counterbalance the cavalry’s advantage in combat, but only if the Indians can engage single cavalry units with two, three or even four warriors at a time. This last point makes positioning cavalry units in mutually supporting positions – too close for Indians to engage with more than one warrior unit – a key Army tactic. It also makes open flanks potentially fatal for the Army.

Tactically, the overwhelming numerical superiority usually enjoyed by the Sioux can be deceptive. A careless Indian player who cedes the initiative to the Army can find himself severely punished over the course of two or three turns, reducing his ability to successfully screen the withdrawal of his non-combatants. The Army’s tactical advantage combines with two other factors to enable the occasional Army victory: the Army’s ability to engineer two consecutive moves, and the unique capacity of the Custer unit to attack during the Army movement phase. This gives the Army the ability to open a “hole” in the Indian line with Custer, then move through and attack with other units. This requires the Indian player to maintain a layered defense at all times, as the Army can and will punch through outer layers in the combat phase, then seize the initiative to move immediately in the following turn, again led by the Custer unit. Once a single Army unit contacts (by being fully adjacent to) any noncombatant unit, the game ends immediately (before the ensuing combat phase).

Victory conditions for the game are variable, depending on how many cavalry battalions and tribes are present. Generally, more tribes or fewer battalions makes it easier for the cavalry to win, while fewer tribes or more battalions make Sioux victory conditions easier to achieve.

The key to winning for the cavalry is early reconnaissance to determine how many tribes are present, combined with a flexible strategy to accommodate the level of Indian superiority in numbers, once it becomes apparent. Small numbers of tribes require highly aggressive Army play, while large villages will force a much more cautious approach. Even with most tribes present, the Army has a chance for victory. More tribes means more noncombatants, with will be more difficult to screen effectively against the Army’s ability to combine consecutive moves with Custer’s unique attack capabilities.

An additional – and significant – advantage for the Army is in mobility. All of the Army units except for the pack train and the “Gatling Guns” (ahistorical – Custer left the guns behind, as they limited his mobility) are mounted, while most Indian units are on foot. This advantage is fleeting, however. Once a cavalry company has engaged in combat, it moves dismounted for the remainder of the fight (the Indians have run off its horses). This feature, besides simplifying play, makes it wise for the Sioux player to engage cavalry units early, even with single warrior attacks. The cavalry will almost always win these initial engagements, but will be deprived of their mobility advantage for the remainder of the game.

The mix of Tribes and the varying configuration of the villages makes each game different. The action can shift rapidly from daring cavalry attacks to seize noncombatants and end the game, to desperate fights for survival by encircled Army battalions on isolated hill tops. It is a fun game to play, easy to learn but difficult to master.


Designer’s Notes Antietam

Designer’s Notes


Taking on Antietam was a daunting task. Many people say this battle can’t be gamed. This battle breaks games. The only way to make it work is to tack on McClellan Idiot rules. I hate rules like this. I call them Band-Aid rules: rules that are artificially added to a game to compensate for a fundamentally flawed model. Ideally, we prefer to allow players free reign. Both sides should be able to do whatever they want and operate under the same rules. How can you make Antietam work without Band-Aid rules? What player in their right mind would do what McClellan did?

We started play testing with 2 Band-Aids: The Federals had HQ ratings of 2, while the Confederates had 4. Jackson even had a 5. Even worse, only 1 Federal Corps began the game active: with a chit in the cup. The other Corps would be added to the cup 1 turn at a time. This got us close to a historical result but why handcuff the players like this?

We tightened up the HQ ratings, Federals: 3, Confederates: 4. That is reasonable and justifiable. The ANV had a sleeker and faster org chart. Much quicker to get orders down the line but the advantage is pretty minimal.

Modern historians have been adjusting the previously accepted numbers. The legend was always that the South overcame the odds with brilliant leadership. There is some truth to this but Federal army strengths were often exaggerated. Early reports concluded that McClellan had 100-120k men. Much of this comes from counting ALL men in the Army of the Potomac. Comparing apples to apples, by counting only Combat Effectives, like the Army of Northern V did, this number falls to 90k, 80k, even possibly 75k. This gets us closer to a solution but we are still looking at Lee being outnumbered 2:1.

Another interesting fact we found while researching the OBs, was that much of the AoP was made up of brand new volunteers: 20-25%. These were raw recruits just thrown into the field. Just days before the battle, there were reports of Federal troops having never fired their rifle, not knowing how to load and fire a rifle, not knowing how to change from road column to battle line formation.

The AoP was not the well oiled, veteran machine that the ANV was. It was just recently cobbled together from mixed Corps and many brand new regiments. Many of the officers had recently changed. Days before the battle, Wilcox sent a message up requesting to know who the other Division commanders were in his Corps. Considering this, it is a small miracle that McClellan was able to get the AoP to Antietam so quickly. That’s right. I just used ‘McClellan’ and ‘quick’ in the same sentence.

Surprisingly, this was the only change we needed to make to get Pub Battles to turn out a historical result. We dropped 25% of the Federal infantry to Green status. Not only does it make the game play like the historical battle, it also makes it more realistic and historically accurate. No McClellan Idiot rules. No handcuffs. No Band-Aids.

The only question left was the speed of development. Should the Federals be allowed to start the game with all Corps active and able to attack? Won’t they overwhelm the Confederates if they can?

The answer to this occurred to me from playing Marengo. The French player can often be lured to his own doom IF the Austrian player develops and moves slowly. Why? Because he is persuaded to think that he might be able to defend and hold the line rather than just fall back like they should. This allows the Austrians to bring their artillery advantage to bear.

This is very similar to what the Federals can do with their artillery advantage at Antietam. Sure, you can plow ahead with all guns blazing on all fronts at once with the AoP if you want. You will likely find your fragile, 25% green army quickly shattered.

Surprisingly, to do well with the Federals, you will find yourself advancing cautiously and methodically at a slow pace, much like McClellan! Falling back if things don’t immediately go your way in an assault to rally and make another attempt in a few hours. This approach allows your artillery to pound the Confederates and keeps you from taking catastrophic losses while assaulting over bridges, through the woods and up hills.

This game and Marengo are not Race-the-Clock games. We removed the active Corps restriction. They are more about finesse, maneuver and timing. Don’t worry, there is plenty of time to destroy your army when you are ready.

McClellan actually had a good battle plan. His intent was to advance on Lee’s left with I & XII Corps. Let the rest of the Army sit in reserve, hoping that Lee would commit his reserves to the left. -Which is exactly what Lee did!

With the right timing, Burnside would then launch his attack to bust across the Antietam and cut off Lee’s only route of retreat. Considering the army that McClellan had to work with, it was a good plan. This is exactly the type of plan that is more likely to succeed in Pub Battles.

Now that I’m here on the other side, looking back at what Pub Battles Antietam has become, I am greatly relieved. Antietam did not break Pub Battles. Pub Battles makes Antietam actually work as a wargame. As a designer, this confirms our model and gives us much more confidence going forward to other battles.

If Pub Battles can model Brandywine, Little Bighorn and Antietam without Band-Aids, can it explain battles like Austerlitz? Chancellorsville?

Marshall Barrington


Learn More about Antietam


Order Antietam

Like Old Friends

Ewell, McClaws, Anderson, Hood, AP Hill.  Doubleday, Mead, Hooker, Sedgwick, Slocum.  They almost feel like a bunch of old friends now.  I got this email recently:


“I haven’t played an ACW tabletop game for a few years now. As I was putting stickers on the Sharpsburg blocks, seeing those familiar old names and that amazing map, I really, really got the urge!”


I feel exactly the same way.  Over the years I’ve grown away from my Gettysburg, Stalingrad, Bulge, Waterloo and Russian Campaign roots to other more subtle and exotic pallets.  I haven’t played these campaigns and battles for years.

It is exciting to see these old favorites come back with an all new approach and perspective.  It’s kind of like seeing the all new Muscle Cars come back:  Camaro, Mustang, Challenger.

After seeing the new Antietam, I am really looking forward to the new Gettysburg as well.  The uncertain move sequence alone bring a mountain of tension to the 1st Day.  I have a feeling, it may just be the solution needed to liven up the 2nd & 3rd Day action as well.