Now available to ship! This makes a very nice expansion to Brandywine. A full on battle using the same blocks. The map is much bigger. The maneuver options are much more open. The British are on defense here. The possibilities are endless.
Attack Upon the Chew House
The game with an open setup here at Germantown is endlessly fascinating. We’ll be doing a Blog and new video on how to do this.
Do I need the Update Kit?
Here is an easy way to tell. Look at your Brandywine blocks. Do you have a ‘Smallwood Militia’ included? If you have that piece, you do NOT need the Update. You are good to go!
If you’re like me, your eyes aren’t getting any better. I know. I hate it too! :/
We are testing out a new style of dice stickers. It is a cleaner and sleeker design: more graphical, fewer numbers, bigger easier to read font.
Big Print Edition Dice
I’ve been testing them out. I like them better. I guess the downside is that they look a little modern. They don’t have that old world, period look to them.
Standard Dice Now
We’re not sure yet if we want to make them available. What do you guys think? Do you like them better? Would you rather have these?
They are easy to change. The trick is to soak the dice in hot water for awhile. Then you just peel off the old stickers and wipe clean with a towel.
In the Art of War, Sun Tzu talks about Dying Ground. It is a fascinating factor, but one I’ve never seen accounted for in a wargame.
Most soldiers in war do not actually fight. Accuracy on the firing range doesn’t translate into casualties on the battlefield. Why not? At first, you might think the adrenaline rush of battle might being throwing off the marksmanship. Psychologist have determined that the real reason is, that most people don’t want to kill somebody. Even the enemy, in a firefight. -Fine, I’ll serve. I’m not a coward. I won’t desert. I’ll stand with my unit, but you still can’t make me kill someone.
Most soldiers from the Civil War would pull their shots: intentionally fire high over the heads of the enemy. Another trick was to not pull your trigger. Load, level your musket but don’t actually pull the trigger. Just keep reloading and act like you are fighting. That’s why they would find many muskets after a battle that were reloaded 10 times but never fired.
The number of men that actually do shoot to kill in war is very low. Down around 10%, as I remember. Imagine if you could get all the men in a unit to actually fight! This brings us back to Sun Tzu. This is what he called, Dying Ground:
When you cannot press forward or retreat; when you will survive if you fight quickly and will perish if you do not –It is said “Put them on dying ground, and then they will live.”
What would that look like in a wargame?
Dying Ground –Optional Rule
Before resolving a Combat, check to see that your units have an open route to retreat. If their route is blocked by impassible terrain and enemy units, they are on Dying Ground.
Units fighting on Dying Ground get a +1 combat modifier.
They will also ignore a second hit retreat result. They will stay in place and keep fighting. The third hit they take will destroy them as usual.
I have no idea what this will do to the game. It may result in all kinds of trouble. It also adds complication and extra rules to
remember. With Pub Battles, we always
try to keep that to a minimum. So I don’t
expect to see this as an official rule later.
Try this out and let us know what you see. Is it good?
Does it work?
Question: When do the Detachments come in? When do they move?
The Scenario specifies how many Detachments for each side. It doesn’t say when or where they arrive. Why? Because you decide that! You assign them to specific Commands for the battle, before the game. They enter or setup with that Command. They move with that Command.
The point of the Detachments, is to create more uncertainty and fog-of-war. That’s why the OB doesn’t specify which one they start with. It would defeat the purpose. How many more blocks do you have to fight with? Is that a real division or baggage train sitting back there? Or just a Detachment? You can’t tell.
If you put them out front, Detachments can be good for screening and delaying the enemy sometimes but they will likely get killed quickly. I find them more valuable in a reserve position for deception. In fact, I often like to keep them on the Reserve Card. I can throw them out to back up a defense when things get desperate. Sometimes an attacker will call off a fight and fall back before he sees that the scary looking support I have is only a Detachment.
Also, a new custom set of flags used at Brandywine for your HQs:
How do you win?
How do you like to setup with the British at Brandywine? What is your favorite strategy? Post a photo of the best possible setup for the British at Brandywine.
We have several new videos out on Pub Battles, if you haven’t seen them yet. We’ve been very hesitant to do any because making good videos is very hard. Most wargame videos are like watching paint dry!
We’ve tried to keep most of these really short and to the point. Let us know how we did and if you want to see more. Watch our Youtube channel to see more coming out.
If you’re new to Pub Battles, here are some rules tutorials to get you up and running quickly. They can also be good to confirm you’re doing things right.
How do you win the game in Pub Battles? I love the new Victory Conditions. They are much more in line with real military objectives. They sound real and feel real. Games can’t always do this but I love it when they can describe things in real world terms.
For example, how do you win?
Be the first player to reach 20 points.
OR
Defeat the enemy army.
Ok, the second victory condition here sounds much better but what does that mean in game terms? As a gamer, this feels a little fuzzy. How do we do that exactly?
I got this question via email today:
What are the concrete victory conditions for Marengo? Is it to destroy the opponents army, or exit off the boards…?
Let’s take a look at the rules. What is the Objective for the Scenario?
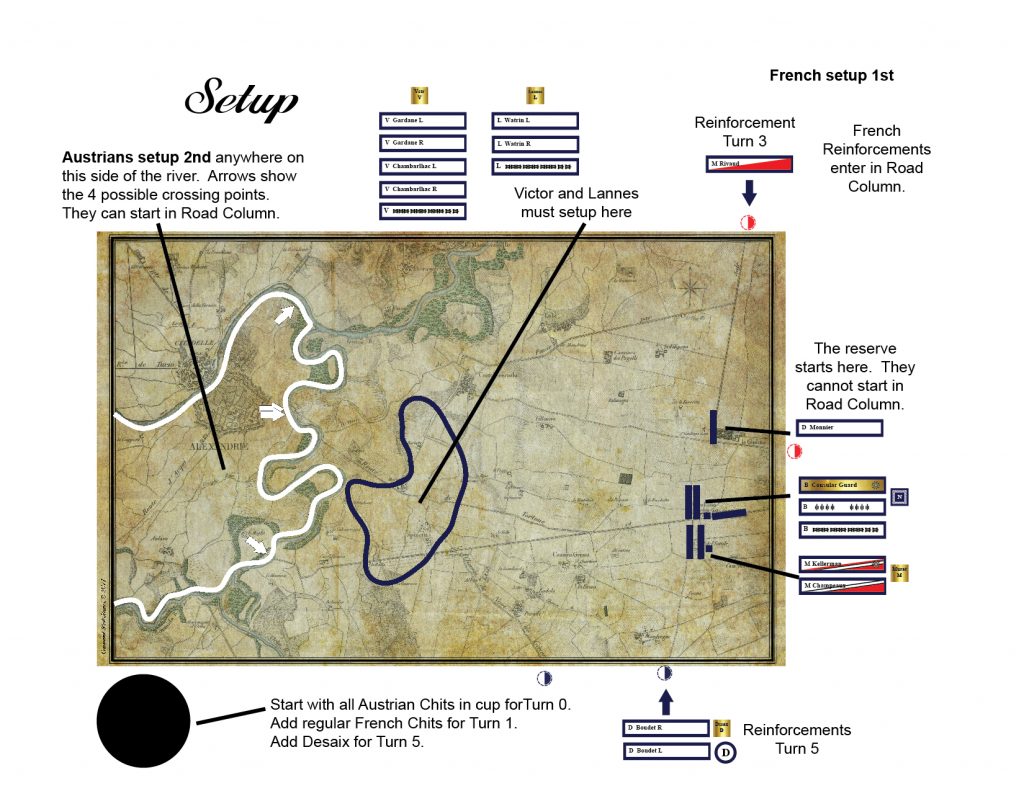
Both sides are running out of time. The French are sitting on the Austrian supply line! The Austrians MUST breakout and reestablish a supply line to the north or east. The French are also in a very tenuous and overextended position. They must defeat the Austrian army to end this campaign.
Ok, so let’s break this down. The Austrians MUST breakout. They can’t just carefully attack and then
fall back if things start going bad. An
Austrian controlled retreat back to base at Alexandrie is a fail: They lose.
The Austrians can win by marching out of Alexandrie and off the board along their marked north / east supply lines. I’m pretty sure the French are going to have a lot to say about that. So the Austrians are going to have to fight their way through the French army to get to those supply lines.
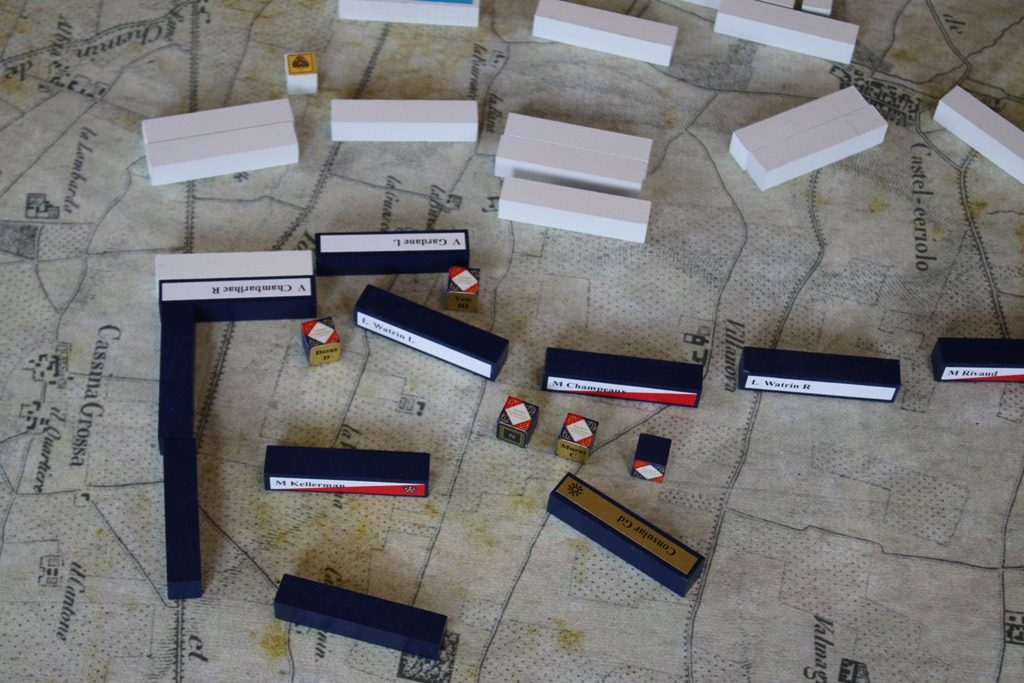
Note: The Austrian Supply Lines are the Red Supply circles on the top and right.
These are the Victory Conditions for the Scenario. The standard Victory Conditions from the
basic rules are also in play. So if the
Austrians are ‘routed’ (suffer 50% losses) while trying to breakout, they
lose. They also lose if the French can ‘break’
them (sack an Austrian baggage train) while trying to breakout to the north
east.
What about a ‘forced back’ result? The Austrians deploy for battle, fight the French, clear a supply line, then pack up their trains and march safely off a supply line while keeping their casualties below 50%. That sounds pretty good to me. I’d call that a breakout: Austrian Victory.
Of course this would all be much more simple, if the
Austrians just march out there and destroy the French. If they can ‘rout’ or ‘break’ the French
army, then it is pretty easy to establish your supply line again right? Heck, you don’t even need to at that
point. You just defeated Napoleon. The campaign is over!
So what is the answer to our email question? Is the objective to exit off the board or destroy the enemy? In short, it is both. All of the above.
See how this is much more in line with real world, military terms? How do you win? It’s complicated. –but it makes sense. Much better than something like: be the first player to get 20 points.
We like to get gamers thinking like real officers, not gamers. The real world is messy and complicated. Yes, you’re gonna have to use your brain and think about things. It’s not going to be that simple but that’s good! That’s the best kind of learning and training you can do.
If you’re like most gamers, you like playing games but not learning new rules. Some times I enjoy reading them if they are really interesting and on a new subject I want to learn about. Most of the time, they are just a chore. Can’t I just plug into the Matrix and download the rules into my brain in 2 seconds?
We can’t do that yet but this comes close. We’ve got 3 new Youtube videos that walk you through the basics. This should get you going and shoving blocks around quick.
We’re not covering every possible rule and nuance. That gets too long. Once you start playing, it’s easy to look up a rule if you need it.
Let us know if you like these and want more!
Yeah, sorry about the cat and my crazy hair!! I know.
I’ve heard several wargamers say that Block games can’t be played solitaire. I strongly disagree. In many ways, I think they are easier to play solitaire. There are many advantages. Block games do present a few challenges for solitaire play. Here are some tips to help you along!
First of all, what’s the big deal? What is so different about block games? The key difference is that the unit types and strengths are usually hidden. Something akin to Stratego.
Most of the time, you can see only your forces. Enemy forces remain hidden. -Euro Front from Columbia Games
East Front -Columbia Games
Doesn’t that make it impossible to play solitaire? I KNOW what the enemy has and where. I just saw it! I KNOW what that piece is.
True, true but we are already used to that with solitaire
play right? We KNOW what the enemy plan
is. We KNOW what they will be trying to
do over the next few turns. We already
have methods to work around this right?
Pretend you don’t know. Play AS
IF you didn’t know. Imagine that you
were the enemy and didn’t know what was coming.
What would you do then? Guess
what? This still works exactly the same
with blocks!
Spin the Board
In fact, I’d argue it is even easier to play solitaire with blocks. In most games you can see all the pieces all the time. You know exactly where all forces are: friendly and enemy.
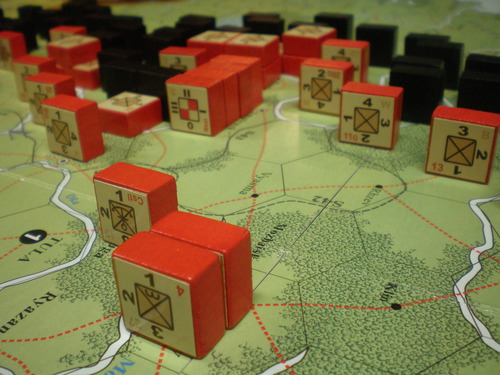
British point of view at Brandywine
Walk over to the other side of the table and look at the board again. The change of perspective makes it easier for me to forget what the other side was doing. Most of the time, I forget what exactly was there. It just looks like a sea of hidden blocks now.
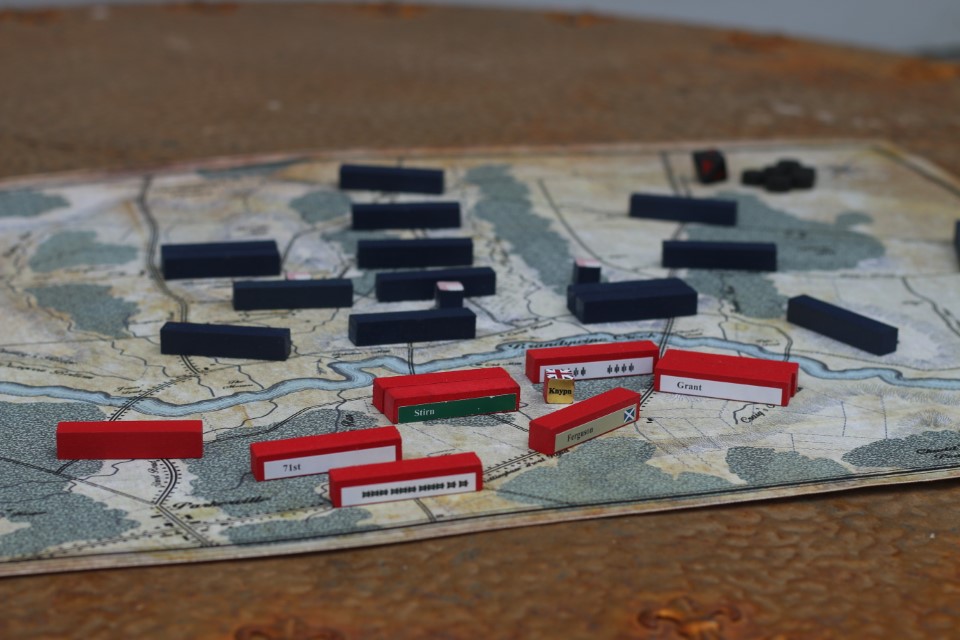
View of the very same British from the Colonial perspective. Remember what each of those red blocks were? What if there is more hidden in reserve?
On occasion, I do actually remember some of the blocks. If you do, no big deal. Pretend you don’t. Analyze the situation as an unknown. If you were the enemy and didn’t know what was going on, what would you think? What would you know? Why? How could you know that? Guess what? If this is the only thing you know right now, what would be your best course of action? This is GREAT training for how you should be thinking and analyzing all the time anyways!!
Let’s look at some examples:
Brandywine
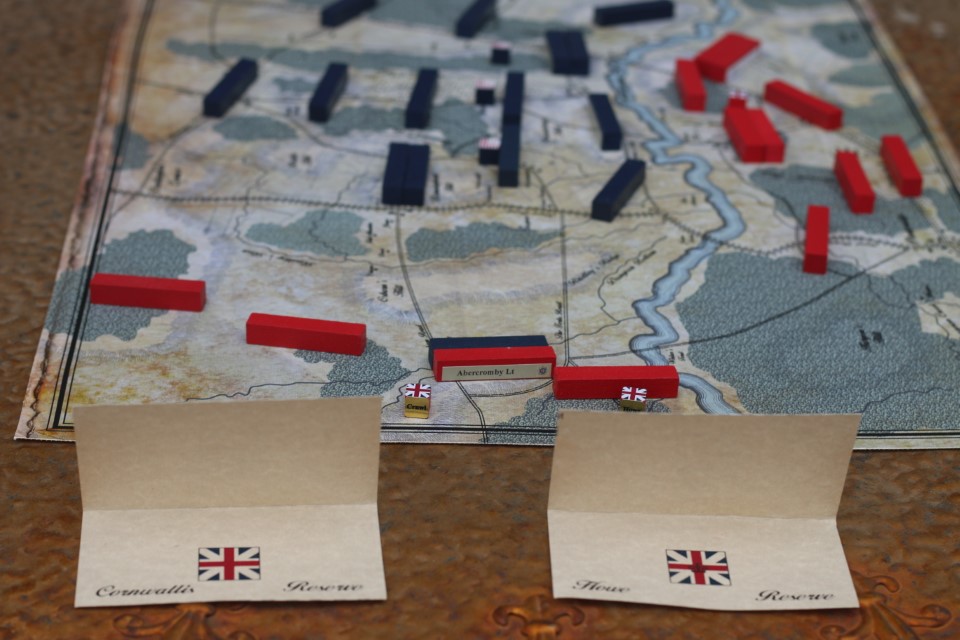
Ok, now here comes the British flank attack!
Fine but as the Colonial player, we still don’t know where the main threat is. What kind of troops are in this flanking attack by the British? Just a bunch of light troops to distract us from the main force to our front?
Note: there is nothing held in reserve on the cards but the Colonials can’t see that.
Or is this the real deal, with all the heavy hitting elite units backed up by a strong reserve.
The HQs (flag cubes) can hide pieces at their location on these cards. Here they are backed up by artillery, elite & regular troops and baggage. Note the units on the far left are full strength cavalry and Hessians, not just a light screen of detachments. This is a huge threat to the Colonials!
What would you do here as the Colonials? If you’re not sure this is a feint, you kind of have to respond as if it were a real attack right?
Gettysburg
It is the end of day 1 at Gettysburg. The Confederates have been driving hard all day. The Federals are paper thin.
The Feds have their HQs up behind their front line in support but there is no one left in reserve. What is on the field is all there really is but the Confederates don’t know that!
Empty reserve. The blank block over on the left is a 1 step detachment screen. That block behind the front line is the Baggage Train. If the enemy hits that, it’s game over!
Let’s take a look at this from the Confederate perspective. IF we knew that’s all there was, we’d launch one final push to knock them out. –But what if we didn’t know? Hmmmm….
Confederate perspective. Looks good but is it really?
The Rebs have taken lots of losses today too. What if they attack, and push hard to fight through a possible 2nd Federal line? It would be very likely that they lose 3-4 blocks. (because they are already spent and fighting up a hill into difficult terrain.) That would devastate their ability as the Confederates to fight into a second day.
Would you be willing to gamble the entire battle, entire war on this one desperate attack? Would the Rebs have any indication of the strength of the Federal reserve now? How many units have they seen today? How many losses did they inflict? How many pieces are they likely to have left? How many Federal pieces have they spotted earlier in the day that are currently unaccounted for? Have the Feds been maneuvering throughout the day in such a way as to keep their forces hidden from the enemy? What does that look like? What things give away your strength and intent?
Alternatively, the Federal forces could have a real, fresh reserve. Wadsworth (an elite unit) is supporting Robinson. Barlow could easily move to back up Schuz on the right.
When you are thinking and playing like this, you are playing Kriegsspiel. This is REAL wargaming. The difference between god like knowledge of everything and playing as if it were real.
Train as if it were real!!
That is the very best training there is. The more you put in, the more you get out. This can still be very effective, even solitaire. In some ways, it’s even better.