Quick question on Pub Battles Ancients…Regarding Cavalry Charge – What is the benefit of the charge? Is it they can make a partial move…combat…and then move again and combat? I assume the target of combat is allowed to reciprocate and attack as well? Just not grasping cavalry charge.
Normally, you move
all your activated pieces THEN resolve all the combats that result.
If a Cavalry piece Charges, it makes a full move and attacks an enemy piece. Now you immediately resolve that combat between the cavalry and the enemy, BEFORE you finish moving the rest or your pieces. You resolve the combat normally with the enemy rolling dice. The enemy doesn’t get any special move or attack back or anything.
Cavalry on Flank
After you resolve this combat, your cavalry piece, assuming it’s still alive, MAY move and attack again IF there is an enemy target within 1/3 move. You can keep moving and attacking with that cavalry as long as you want to. Once you are finished with that Cavalry, THEN you can continue moving all the rest of your activated pieces.
Cannae
Very
powerful. Especially if most of the enemy
is spent from previous attacks. That
gives you the plus mods. With a little
luck, the right timing and elite cav, you can ride down and obliterate most the
enemy army in 1 turn!
You need to get things setup right first. The key is to get most of the enemy spent while you have Fresh Cav ready to strike!
1) It is more realistic. Like it or not, that is the way the real world works. You want your wargame to be more realistic right? There ya go.
2) More tense, more excitement, more fun. People don’t flock to play Chess like they do to the Casinos do they?
3) It makes the wargames more accessible to new players. Yes, you hate it when you play better and some new guy, that made lots of mistakes beats you because of luck. Well, so what? That’s life. It happens in real war. So let the new guy enjoy a cheap win. Why not? You still had a fun time playing an interesting, historical strategy game and learning a few things.
Look at this from the new guys
perspective. Would you like to play a
new game where you are 100% guaranteed to always lose for the first 40 games while
you are learning it? Doesn’t sound like
fun to me. We complain about shrinking
numbers in our hobby. Why is it so hard
to find new players? Well, gee. Maybe if the hobby was a little more welcoming to new comers, it would get
better. Even if you are very nice,
losing EVERY time is not welcoming.
More luck opens up more
opportunity for new guys to actually win.
This is a good thing!
4) It teaches you good, real world, command/leadership skills. In the real world, things often go wrong too. Many things are out of your control. Murphy’s law. Do you ever see problems come up at work? Things that break and go wrong when they shouldn’t? The schedule gets completely blown out? Sure. It doesn’t do any good to complain about the odds or explain about how that should have never happen.
What can you do? What do you do now? How well can you react? Did you have a contingency plan? Why not? That is what the best leaders do! It is a big part of what made Napoleon so fast and devastating. (Not that he just had a big + combat modifier.) Plan for things possibly going wrong. Look for new opportunities to exploit now that things did go wrong. When one door shuts, new ones open up. Learning to live with and manage luck, trains you to be a better leader in real life.
This is a comparison evaluation of two war games based upon the battle of Marengo, that took place on 14 June 1800, near an Italian town of the same name. The Austrians under General Melas managed to surprise Napoleon (Napoleon under the impression that they were withdrawing). The attack resulted in French forces being driven back initially, and it looked like a solid victory for Melas. But the arrival of Desaix, with his reinforcements, the French turned the battle around.
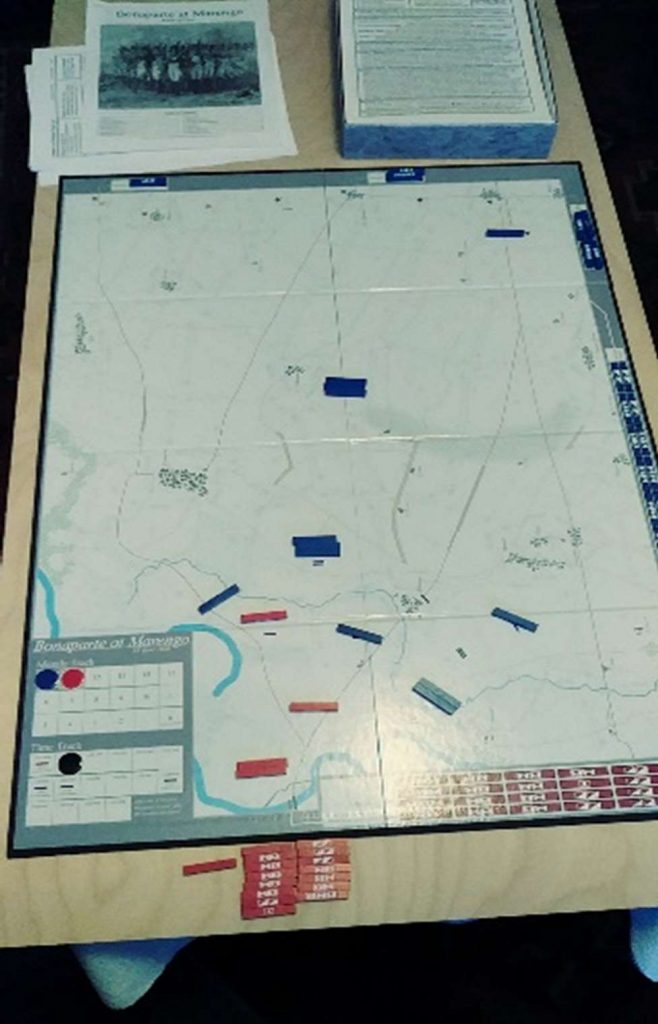
Simmons Games, “Bonaparte at Marengo”, was published in 2005, and the second game on the battle is by Pub Battles, called “Pub Battles Marengo”. I personally owned one of the games and Pub Battles graciously provided a copy of their game for the review. I will describe each in comparison based on the map boards, playing pieces, and rules of play.
Map Boards
Simmons: This version has a map board, printed and mounted, that is broken down by areas called “locales”, where the sides of the locale are referred to as “approaches”. Each approach is marked with NATO symbols representing cavalry infantry and artillery to identify penalties for attacking across that approach.
Simmons
There are two other symbols as well, representing cavalry obstruction or impassible approaches. Each locale has a limit on the number of units that can occupy that locale. The battlefield has been simplified by only including the parts of the battlefield that directly impacted the fight. So, the western edge begins with the river crossing point that Melas used, having a bridge and a pontoon bridge alongside. The map is not completely to “scale” as some towns have been given a greater size, or buildings of nearby farms and villages are consolidated into one “town” (probably for the sake of simplifying the features and clarifying the terrain).
Pub Battles: The map used here is the actual antique map of the battlefield, void of “areas” or “hexes”; you are literally plotting your moves on the original period map as a general would do on the table of a handy house or tavern. I was provided the paper version of the map which I laminated at FedEx for about $20 (it already had a small tear, so I wanted to protect it).
Pub Battles
The map has been only partially colorized, with major woods represented in green. Mostly everything else is black outlines on brown tinged paper. Aesthetically, it is very appealing, giving you the feeling of participating in the planning of historical troop movements, but I found it often difficult to figure out what I was looking at as the game’s terrain chart is part of the system rules (bought separately), is generic to the system, and doesn’t have pictures to provide examples. Players should probably go over the map together prior to starting and make sure they concur on their interpretations of the features.
Reading the terrain is sometimes difficult.
Playing Pieces
Simmons: The playing pieces are 1 1/2 by 1/4-inch rectangular blocks that represent infantry, cavalry, and artillery formations. They are generic, only representing strength points, which are printed on the color blocks. No leaders are represented like they are in later Simmons’ games; leadership is abstracted by allowing each side to move three formations per turn. I find the lack of unit or lead identification takes away from the presentation of the game.
Simmons units with strength points.
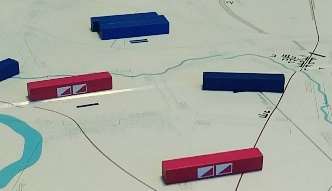
Pub Battles: The unit pieces are 1 7/8 by 3/8-inch rectangular blocks with printed labels applied that have the names of the commanders and symbols representing the type of unit and whether it is “elite”. I like the representation of the units by commander name’s that were involved in the battle, but the strengths of the units (all are “3-step”) generalizes their unit size in the battle. This does make sense if you are looking at this to be simple and fast paced, without complexity.
Pub Battles with symbols for artillery and elite.
The other pieces are small cubes represent major leaders of the formations represented in the battle on both sides, with corresponding cylindrical pieces used for a “chit pull” from a cup to determine which formation moves first. The game has a wooden rectangular measuring stick for movement and artillery fire. You apply stickers on one side for cavalry movement and the other side for infantry movement; stickers divide the segments of movement in thirds. A little confusion as to where to apply the sticker as my game copy came with three different scales which required contacting the company to determine which was correct.
Rules
Simmons: The rules for Simmons Marengo are nine pages of smaller print and detailed (read complex). Understanding the sequence and application of the combat system requires several read-throughs of the rules. There are examples with pictograms to ease understanding, but it isn’t a simple task to grasp. The game is diceless, so combat effects rely solely on type and strength of a unit, its position, opposition, and if there is defensive artillery. Plan on reading the rules several times to play and to read again before the next time you play.
Pub Battles: The rules here are simple, easy to understand and follow with only nine pages with large print and illustrations. The rules for the specific battle are only two pages, but lacks information specific to the terrain on this map. The difficulty once again is the map in determining where you can move, how far, and what you are actually sitting on. Without a terrain guide, players have to examine the map and agree what the terrain symbols actually represent. While I enjoy simplicity in the rules, I feel more could’ve been added to clarify terrain and movement. It could stand to have a snapshot of a section of the map to give examples of the terrain and play.
Game Sequence
Simmons: The game has 16 turns, broken down into hours. The turn sequence is:
Resolve artillery bombardments,
Conduct assaults,
Movement, and
Declare bombardments.
Any units that are in an approach can declare an “assault” on the adjacent enemy controlled approach. Movement is either moving one locale across a bordering approach, or by road movement. This is also when they can conduct maneuver attacks; the moving player can declare a maneuver attack across an approach. The defender can choose to move a unit from the “reserve” (center of the locale) and move it into that approach to block the maneuver, or they must retreat from the locale. The game is as much maneuver as it is combat. As you will read later, combat in the approaches seems almost discouraged.
Pub Battles: There are only 8 turns, approximately representing 1.5 hour increments. First turn is all Austrian (as they surprised the French), so the only chit pulls are them, with the French chits set to one side. Because of terrain movement restrictions, this really only amounts to getting them across the bridges and into positions opposing the initial French ones. After that it is a series of random chit pulls till both side’s formations have moved. Then all fights due to contact are resolved. Very easy to follow and execute. It becomes interesting when situations develop like a formation that was spent and forced to retreat is re-engaged before it has its turn, which prevents “rallying” and forces the unit to withdrawal or to spin about and be subject to assault while “spent”.
Movement
Simmons: Movement is pretty straight forward and even implementing a realistic staggered road movement where three pieces can use the same road, but must stop short of the preceding unit’s locale, i.e. first moves three locales, second moves two, and the last only one (strung out in column). Non-road movement is one locale at a time. Movement within a locale to an approach in a locale counts as a move as well. There is no racing across the map in this game. Cavalry can move straight into an approach by “continuation” and can make a maneuver attack if moving by road and attacking through an approach crossed by the road.
Pub Battles: Movement is measured with the stick and difficult terrain like rivers, streams, marsh, and woods reduce your movement by 1/3. So, you can easily be brought up short by the stream/marsh directly in front of the river crossing at the start. I greatly appreciate the “oblique movement” rule that allows units to shift their forward movement 45 degrees from center as they move, while maintaining the same facing. This makes it a lot easier to move and position without a lot of measuring. Changing your unit’s facing is free once, but then costs 1/3 movement. Additionally, you cannot end your move in the “firing arc” of an enemy unit (1/3-foot movement out the front of the block and 45 degrees of either end of the block) unless you close to contact and fight. This makes for a lot of maneuver, as you can often fall just short of contact. No template for a firing arc is provided, but it was fairly easy to make one out of cardstock.
Pub Battles Firing Arc
Once you’ve played through a practice game, it is fairly fast-paced for movement. What is unique about this system is that despite movement sequence being determined by formation “chit pull”, no combat takes place until all formations have moved (with the exception of artillery bombardment, which takes place during movement instead of moving the guns). This results in a swirl of maneuver and counter-maneuver, where each player must decide whether to move into contact or flank, knowing that it may change if the opposing formation hasn’t moved yet.
Combat
Simmons: This is where Simmons Marengo gets complicated. As discussed before, the game is dice-less and relies on strength, unit type, and position to determine the results. Assaults are declared by units in an approach against enemy units in the opposite approach and this happens before movement. Each approach has symbols of units to show there is a penalty for attacking across it, representing a reduction in attack strength of one. There is an infantry symbol in every approach on the map, indicating that there is always a reduction for infantry, which makes no sense, as many of the approaches are clear, flat, terrain. This guarantees that almost any attack on a “narrow” approach will end in a win for the defender, so the game is initially attrition and maneuver, until units start losing strength. Some of the approaches are wide (two units) allowing for two “lead” units in the assault, which could actually allow a first try win by the attacker if they plan it right. What I do like about this is the chess like approach of no dice or luck. What the game tests is your ability to plan your assaults, maneuvers, and bombardments, to try to gain the advantage. A first game between two new players will almost inevitably end up in an argument and review of the rules.
Pub Battles: Combat is simple: units in contact fight. But as pointed out under movement, it is easy to end up with a fight where flankers have become flanked. Combat is resolved in order of the forces with the best command ratings, but since Austrian forces are “3”, French forces “4” and Napoleon is “5”, that will always be French first, making the need for assigning command ratings rather pointless in this battle, as the Austrians are never “first”. You roll three 6-sided dice for combat, with 1-3 missing, and 4-6 causing a hit. So, each roll can be three misses, three hits, or somewhere in between. Combat results are recorded by using the block itself to track; a unit starts as “fresh”, one hit flips the block to name up (spent), second hit causes a retreat of 1/3 foot move and face the rear, third hit removes the unit from the battle (the unit has “shattered”). This combat results system is simple, but full of luck. In my game I played against a friend, 4-5 poor rolls in a row against his better high rolls and I had two French formations essentially out of the fight, since once a formation has lost half its units, it is “ineffective” and can no longer “rally” (return from “spent” to “fresh”).
A “spent” unit can return to “fresh” by not moving one turn, flipping to “fresh” and it may change facing. Two of the French formations only have two units, and the rest aren’t much larger, so it doesn’t take long for the French to be in trouble. The Austrians have a couple small formations, but the main formation under Melas is huge and is not likely to become ineffective. A rule that didn’t make much sense to us in play was that any infantry unit occupying buildings is automatically “spent” and cannot return to “fresh” while in the buildings. While this grants the unit the benefit of having no flanks, I would think that no one would want to use this as it only takes one hit to force them to retreat and two to destroy it, so there is no real Pub Battles firing arc benefit in the game for occupying towns/chateaus unless your infantry unit is spent already and cannot rally (i.e. ineffective). Using the Hugomount and La Haye Saint as examples, this seems ahistorical, as towns and villages were frequently used as anchors for battle lines, because they were not easy to take. In our game, we agreed to a house rule that any attack on the unit was also -1 on the die rolls to make it more realistic and appealing to defend towns.
Victory Conditions
Simmons: Morale is handled as a point count of combat losses for the whole army. First army to reach “0” and the other side wins, providing they didn’t reach zero at the same time. As the units are generic with no leaders represented, there is no effect of morale represented below army level, except that one-strength units cannot “lead” in attack or defense.
Pub Battles: The side that has lost more than 50% of its units (not counting artillery) loses. If neither side lose more than 50%, then there isn’t a winner. Once again, in my opinion, this favors the Austrian player as they have plenty of units. Our game did run out almost to the last turn before he managed to pick off the last block of the French to win. The game becomes a contest for the French player not to lose, rather than trying to win. Maybe when I have more games under my belt, I’ll see the game as less favorable to the Austrians.
Conclusion
Simmons: The game has a relatively complex combat system requiring a thorough understanding of the rules and its nuances. I quite enjoy playing a game that is not subject to the whims of a dice roll, but it does have its issues, such as the automatic infantry penalty that precludes a win by an attack in an assault. The game could stand to have the rules updated to match improvements made in the later game “Napoleon’s Triumph” (Battle of Austerlitz) in regards to formations, leaders, and battle resolution. It is no longer in print at the moment, so a copy of the game online goes for about $80-150 each, sometimes higher.
Pub Battles: I found the game against my friend to be exciting and enjoyable, as well as frustrating, as you are only a few bad rolls away from being routed from the field, due to the 50/50 combat results, as anyone who’s played Risk knows. The combat modifiers for “elite” units, flanking, and terrain does off-set this luck factor somewhat. I would definitely play this again, with the understanding that it can be swift and subject to the random chance of the roll. The basic rules set starts at $36.24, and the Marengo game itself is $73.25 for the basic (paper map and game pieces) and up to $129.95 for the canvas map and pieces. I consider this a bit pricey, but comparable to the current price of the Simmons game, and it is definitely enjoyable to play. And as they mention on the website, once you have the basic rules set, you can design your own battles as long as you can find and print a copy of an old battle map and wooden blocks. This is definitely a “pub” game; fast and furious and more “playable” than Simmons’ Marengo, but sometimes fickle in the results; much luck involved. So, if you get a copy, enjoy, but have a thick skin when you opponent regales the bar with the battle highlights as you buy the pints.
Editorial Comments:
The wooden measuring sticks are sold separately and do not come with the game.
A common mistake by new players is to fight every combat round possible. This amplifies the luck factor. Staying for additional rounds is optional. Experienced players can easily mitigate most of this by carefully deciding and planning when to press the fight and when to fall back.
As it turns out, this is exactly what the rules call for. Buildings provide cover which give the attacker a -1 penalty. Chateaus like Hugomount and La Haye Saint are even tougher to take as they do not cause defenders to become spent by entering.
What are the differences between the Ancient system and the regular musket Pub Battles? Is there anything new?
No map.
This makes the moves much more quick and simple. No road column formation changes and tricky maneuvers
to figure out.
No FoF or disengaging.
No formal Commands. Every HQ can command any troops in range.
No waiting till the end of the turn to resolve
combat. You resolve combat immediately
after you move.
Leaders can be killed!
No Baggage Trains.
There are also some new rules that we plan on incorporating into our Musket Battles as we move forward:
Unified point system that allows you to create your own armies and fight unknown battles. I really like this. That way you can march into a battle and fight a completely unknown situation. You have to deal with whatever you find and react accordingly. Much more realistic in many ways.
We are zeroing in on a unified and comprehensive victory system based on points. We’ve been testing this in all the Pub Battles. It is the standard with these rules. Works for just about any battle. If this continues to work, we will be adapting it into all Pub Battles soon. We’ve been getting fantastic results with this when combined with the Baggage Trains in the musket battles.
New 1 Step blocks: “Dispersed Troops”. This greatly ups the deceit and fog-of-war, especially with the unknown OB.
Wow! I’m really enjoying fountain pens lately. They really do make a big difference. There are many benefits and advantages to using them. This is a good video on some of the basics:
This guy really likes the Montblanc Meisterstuck 149:
That is a bit too pricey for me. I’ve been getting very good results with customized Watermans.
Do check out the Goulet Pen Company! They have many great videos to learn more. They have many lower and medium priced pens to try it out.
They also have lots of cool custom inks and notebooks / paper. I really love these ones:
Very handy for jotting down notes, thoughts, To Do lists, game design ideas, etc. They come with page numbers and a Table of Contents so you can easily find stuff later!! I can’t recommend them enough.
No, this is not an advertisement. We are not getting paid in anyway to talk about these guys. I just really like this stuff and thought you guys might enjoy it too.
For large armies, units typically represent Divisions. 2,500-5,000 men.
For smaller engagements, they can represent Brigades. 750-2,000 men.
We assume that units of this size have a smattering of guns
attached to them. Artillery pieces represent
a larger concentration of a Corps reserve artillery.
Most often, organize Commands into Corps. Depending on the size of forces involved, you may want to group these together into Wings. Typically 3-6 Commands per side works best.
Miniature Scale
2mm miniatures work really well. You don’t even need basing. Just line up 3 stands for each Unit.
You can even use Kriegsspiel blocks for the units.
Scale Conversion
Pub Battles is made to fit an entire battle on a small
table. For miniatures, you may want to
scale it down to a bigger size.
For example, you may want to double a 2 x 2 foot Pub Battles
map into a 4 x 4 foot big table. Scales
would now be double as follows:
What do Quill pens have to do with wargaming? I’m not completely sure but I really like this video. There is a good chance you guys will like it too.
It was very cool to find out what red ink is for. I never knew that!! I’m going to start writing out ‘chore lists’ for all our teenagers in red now. lol….
Check out this site. He’s got a lot of really cool stuff here:
I get a little confused while changing into Road Column, marching and back out again. Can you explain exactly how this works?
Sure! Great question. The process is simple, it can be a little tricky to keep it straight in your mind while doing it. This is how I do it:
It takes 1/3 move to change formation. While in Road Column, you move double. So I think of it this way: you have 6 little, 1 third segments that you can use during your turn; at Road Column speed, right?
So let’s say I’m sitting on a road but I’m in line. I have a total of 6 segments to use right? It takes 2 of those moves to change into Road Column. That means I have 4 moves left to march along the road.
How far can I go if I want to change back into Line? Well, just remember it is going to take 2 of those little moves to change back right? So if I’m already in column, on the road, I can move 4 moves along the road and then spend my last 2 to change back into line.
So how far can you move if you start on a road, change into column and then back out into line again at the end of my move? Simple. It takes 2 moves to get into column right? It will take 2 more to get back into line at the end of your move. So that means you can use 2 moves to march along the road.
That’s fine but that works out to be 2 thirds of a regular move right? If you are going to do that, you might as well just stay in line and march there. It works out the same if you are going through bad terrain.
This is a good base line to keep in mind. In order to make it worthwhile, you need to be moving further than 2 thirds of a regular move; assuming you are getting in and out of road column all in the same turn.
Do you plan your moves differently? That’s ok. If you already have a way that makes sense to you fine. Keep doing it that way, as long as it works. There are different ways to think about it.